Looking for something? Search Here..


Generic selectors

Exact matches only

Search in title

Search in content

Post Type Selectors

Author: Sharon Hepzibah

  • Adding a Simple Product

    This section allows administrators to create and manage Simple Products without variations. It provides fields to define product details, pricing, inventory, and shipping to ensure the product is properly listed on the storefront.

    To add Simple products follow these steps:

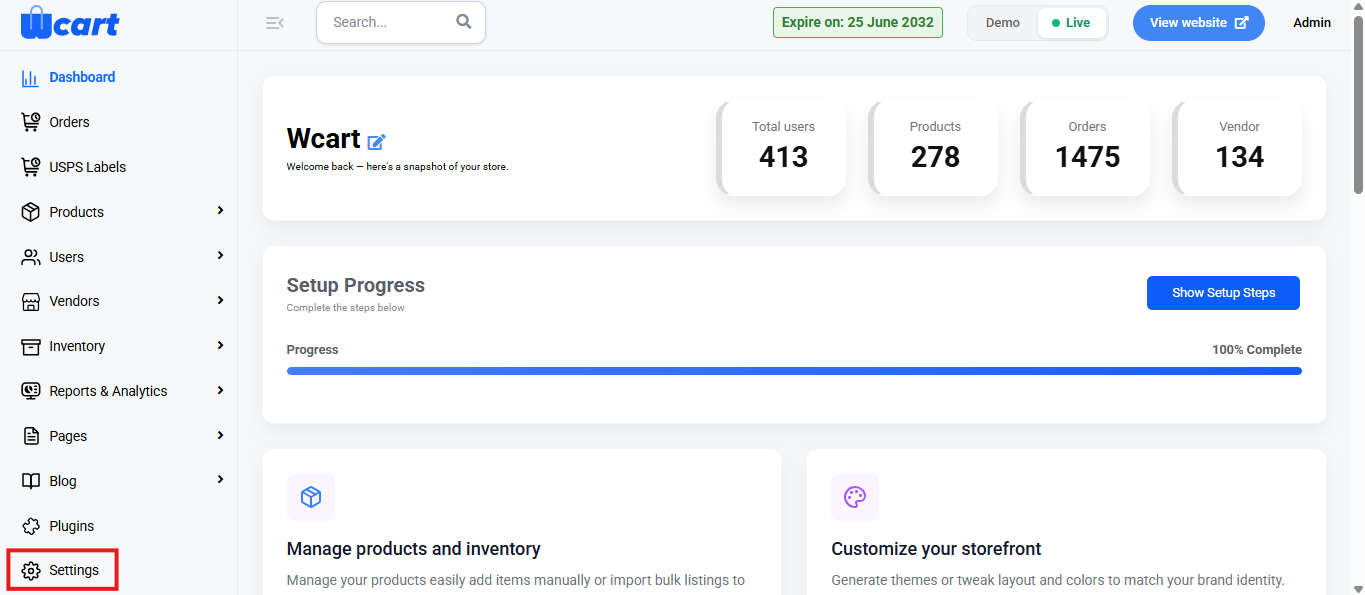
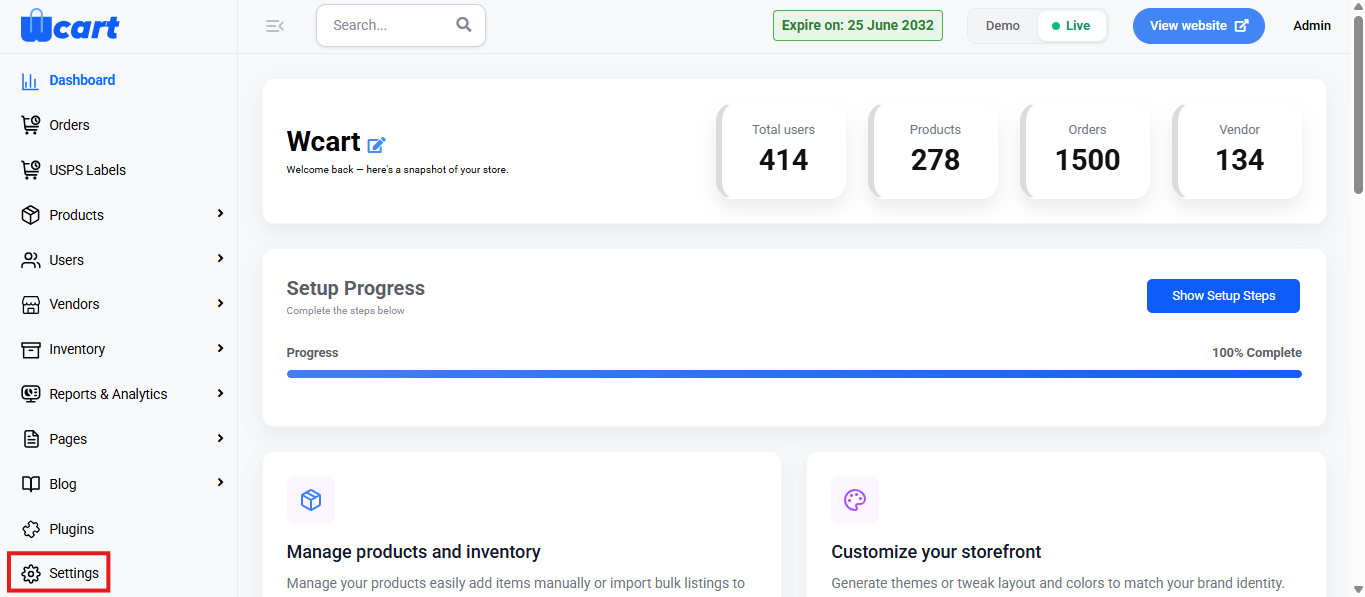
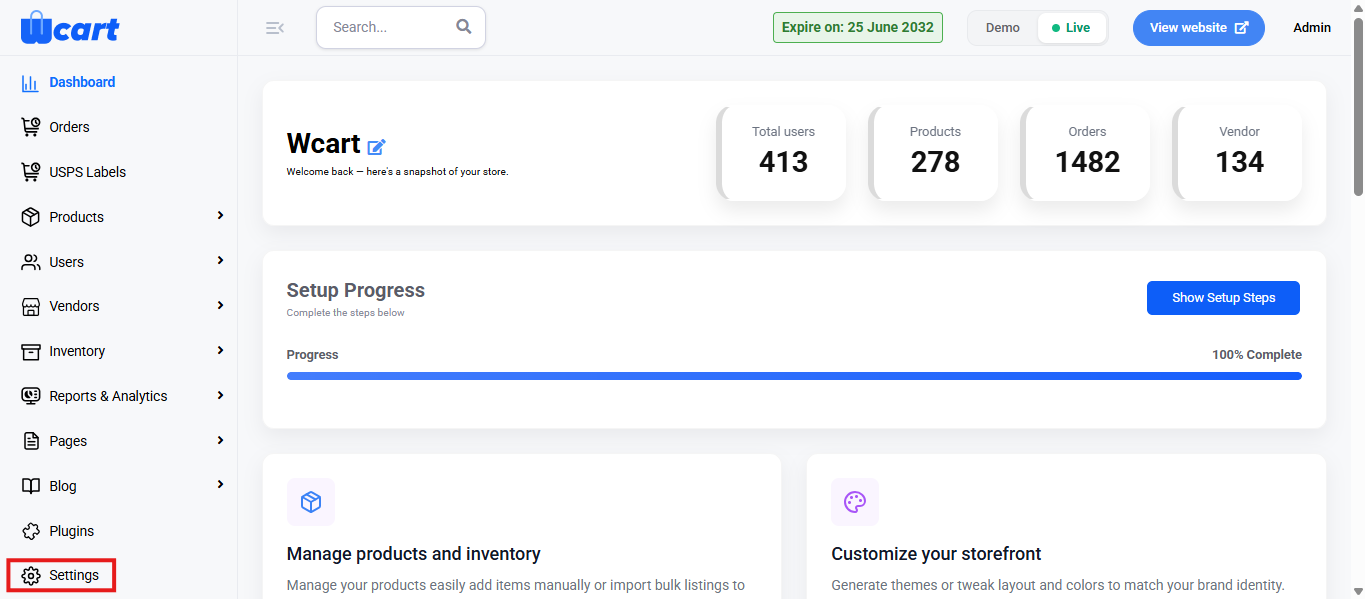
    • Navigate to the sidebar menu and select ‘Settings’.
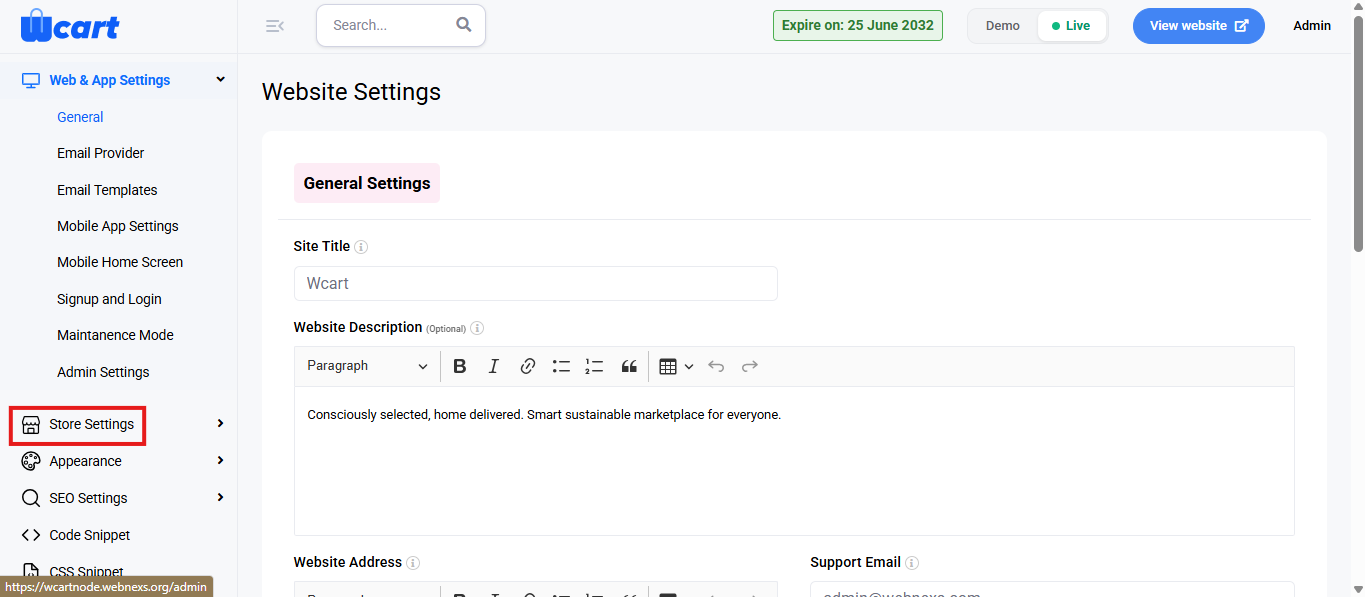
    • Select ‘Store Settings’.
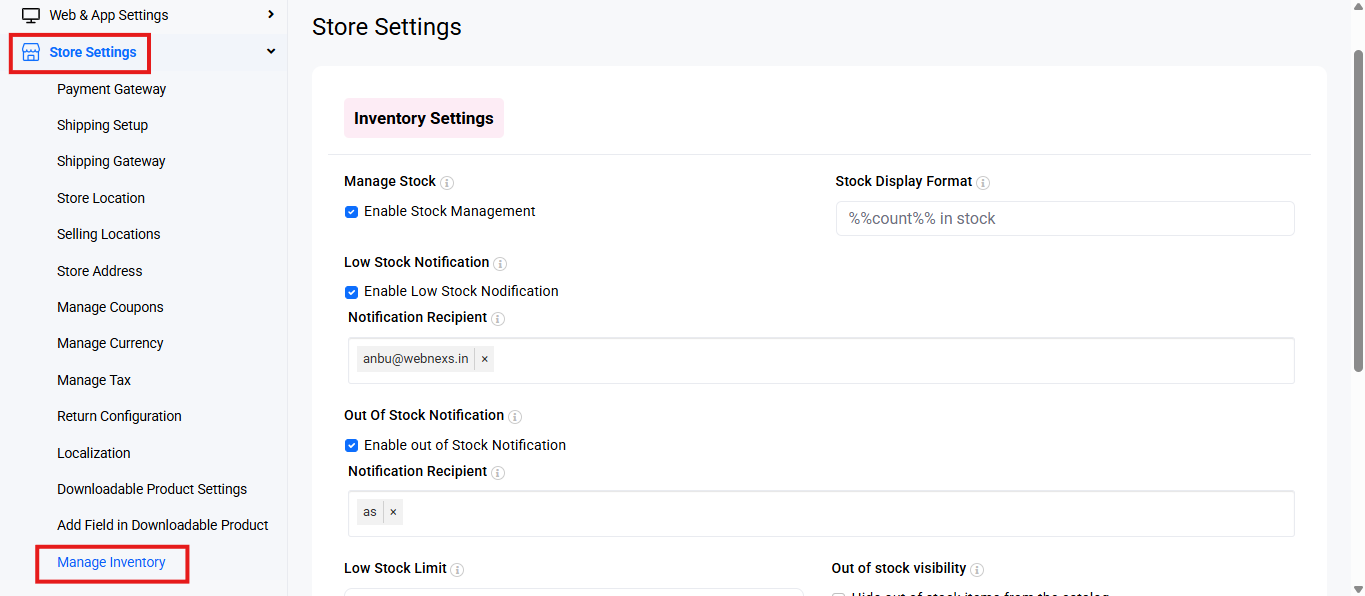
    • Click ‘Manage Inventory’.
    • Scroll down to the ‘What I plan to sell’ section and enable ‘Physical products’, ‘Digital products’ or ‘Both physical & digital’ as required. 
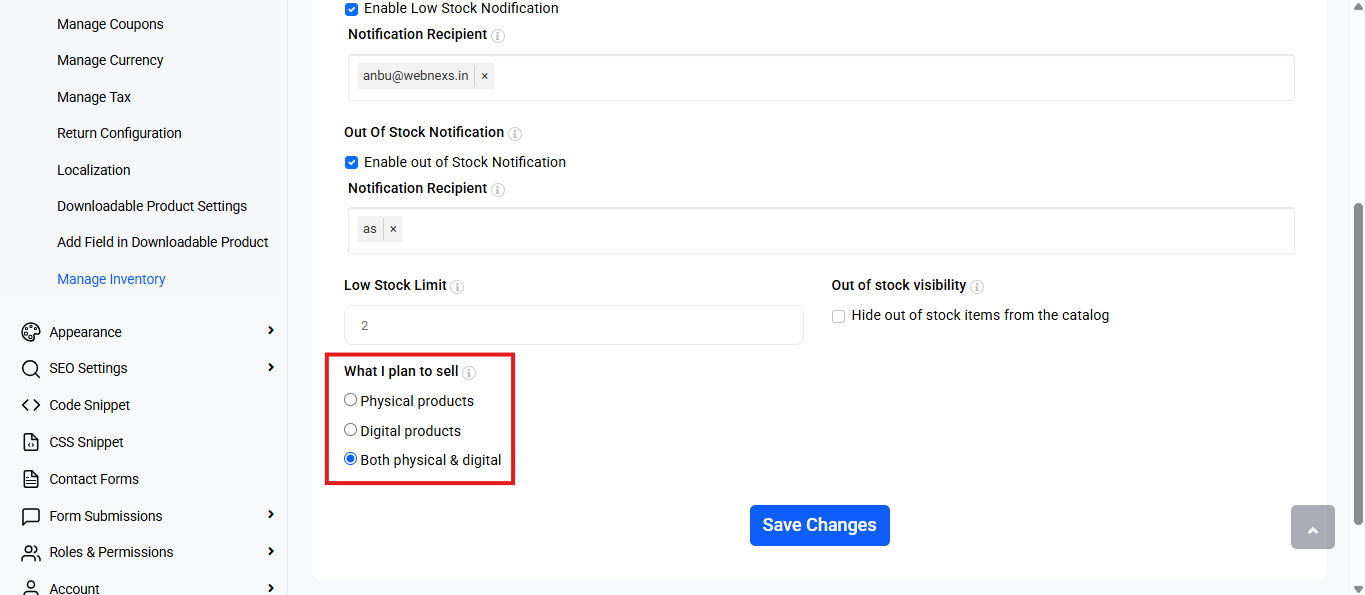
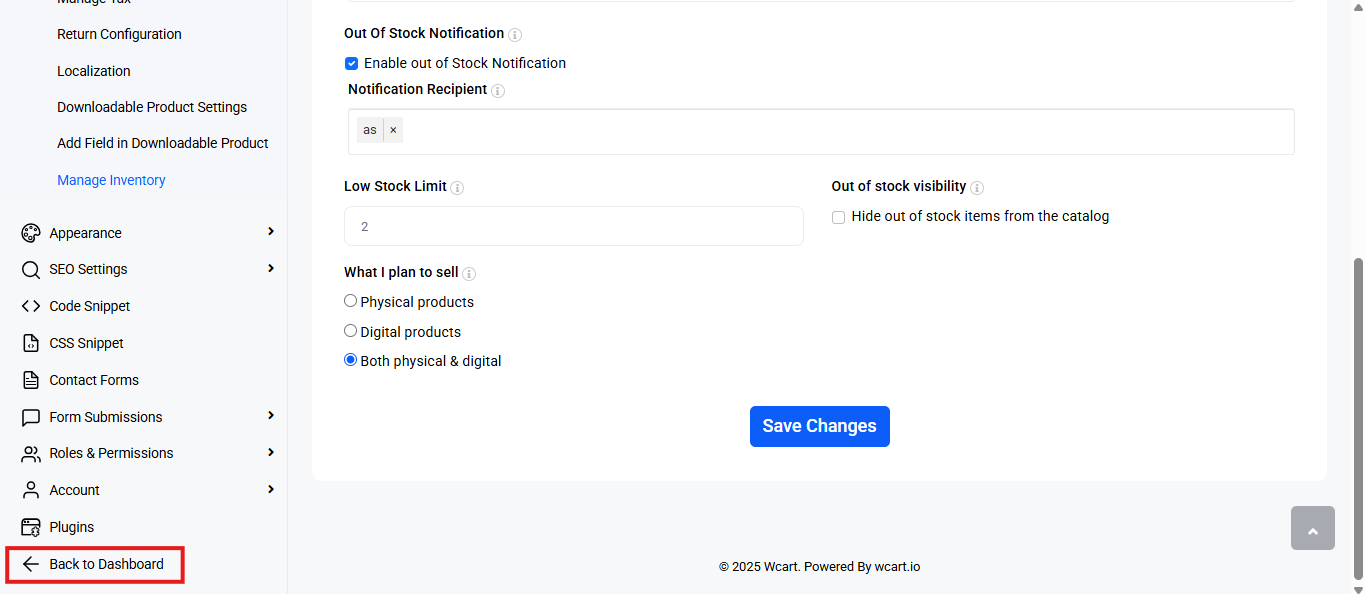
    • Then, navigate back to the sidebar menu and select ‘Back to Dashboard’.
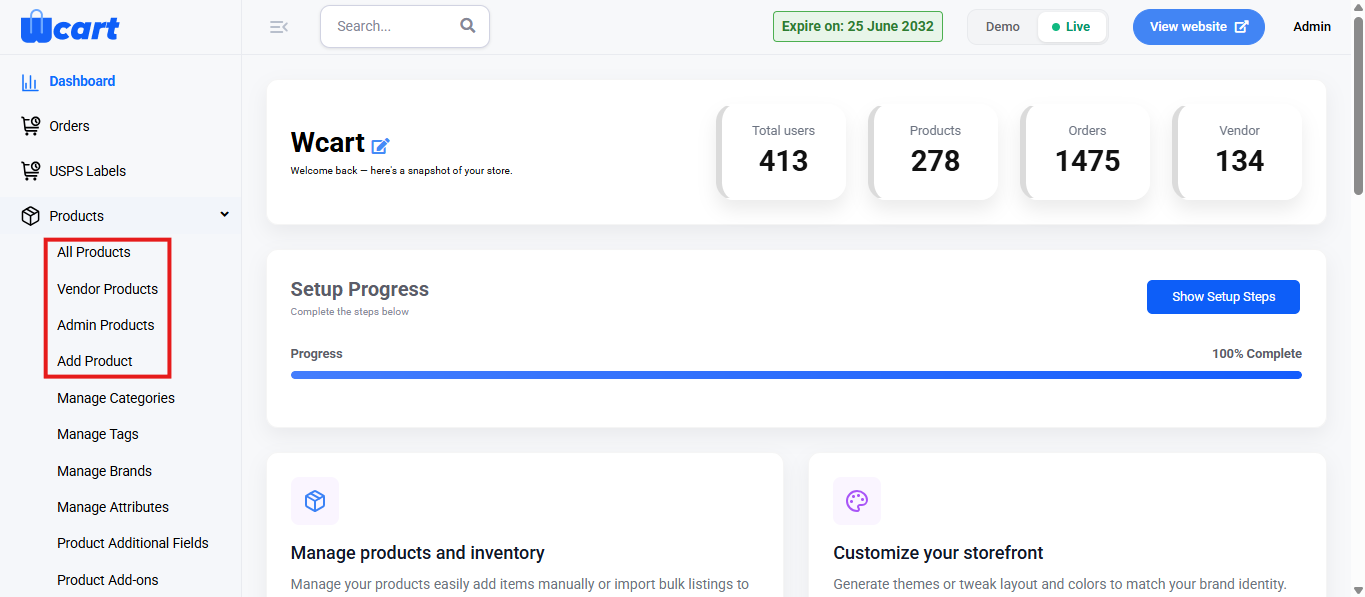
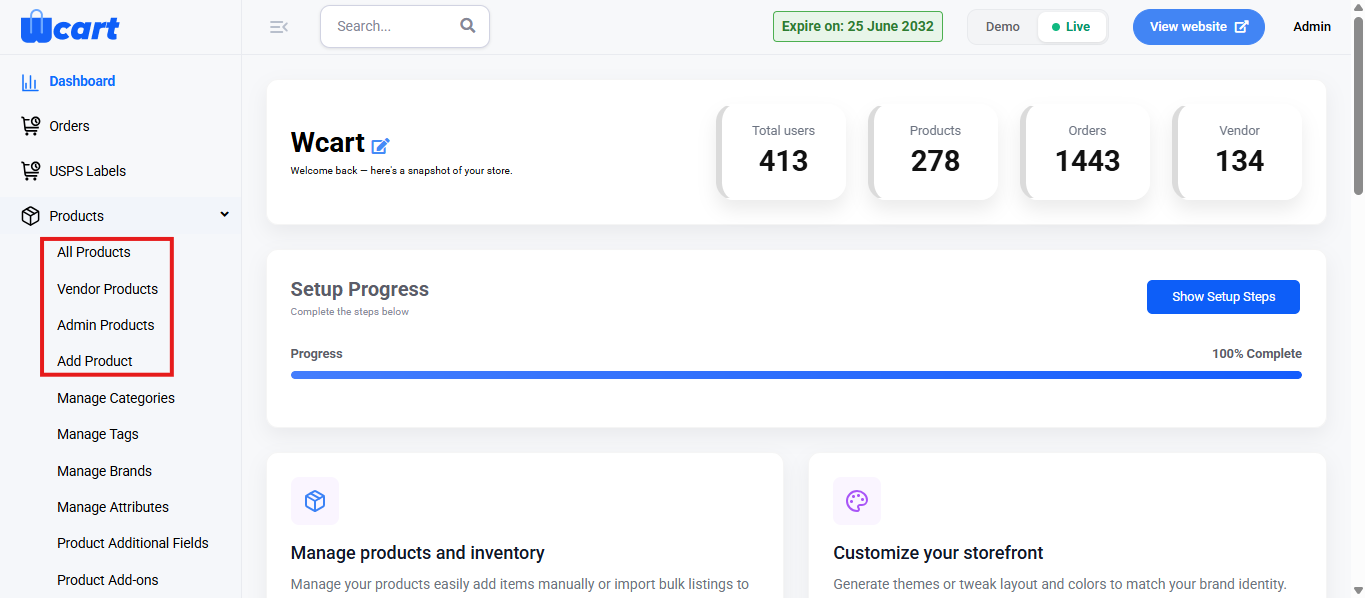
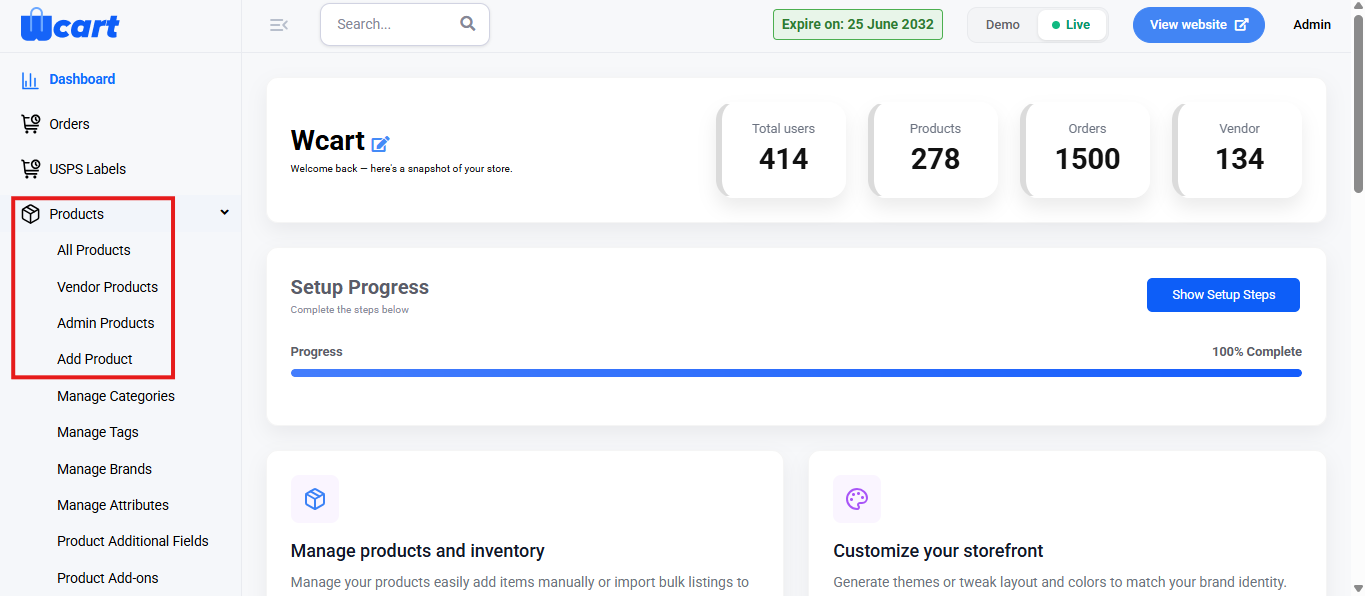
    • Click ‘Products’ from the sidebar menu and choose from the available options: ‘All Products’, ‘Vendor Products’, ‘Admin Products’ or ‘Add Product’. Simple products can be created from any of these four sections.
    • Click the ‘Add Product’ button at the top-right corner of the page. This is common across all four sections: ‘All Products’, ‘Vendor Products, ‘Admin Products’ and ‘Add Product’.
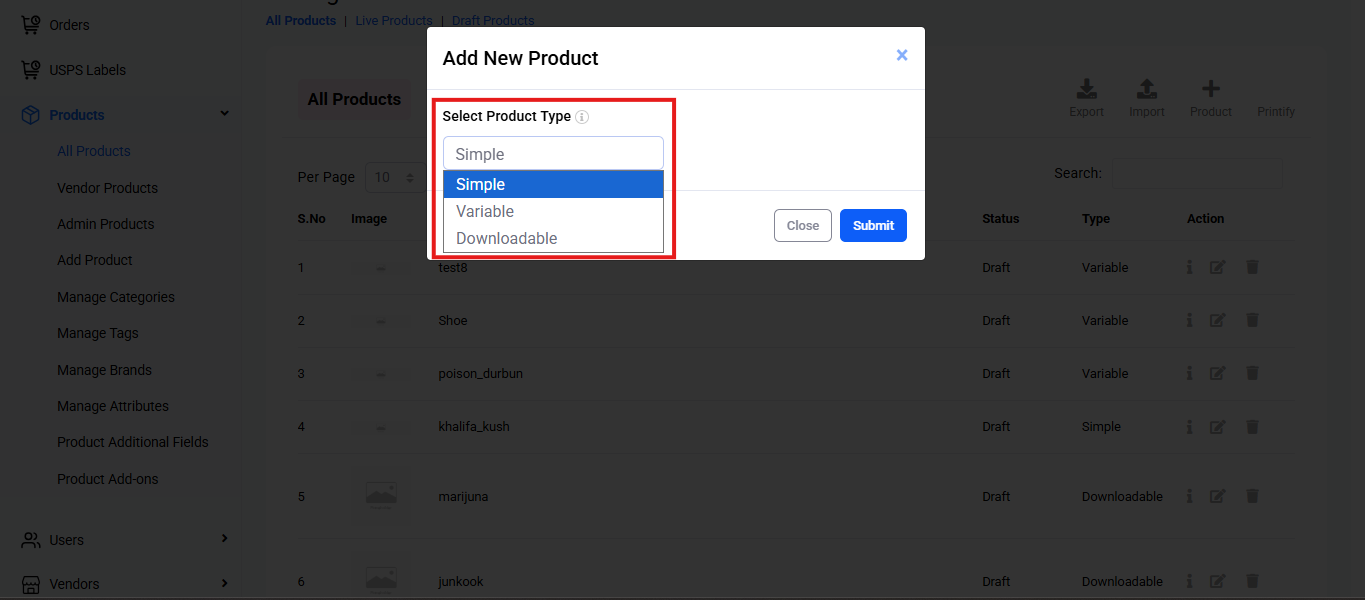
    • Then, select ‘Product Type’ and choose ‘Simple Product’.
    • Click ‘Submit’ to apply the changes.

    There will be three editable pages to configure the product details. Enter all the required and mandatory fields to list the product.

    The below are the fields in the first page:

    • Product Name: Enter the name of the product.
    • Select Categories: Identify and select the most appropriate categories for the product’s classification.
    • Primary Category: Set the main category for filtering and navigation purposes.
    • Select Tags: Add searchable keywords or tags related to the product to improve discoverability.
    • Select Brand: Choose the associated brand from the available list.
    • Regular Price: Enter the original price of the product.
    • Tax Price Excluded with product price (Change): Clicking on ‘Change’ will redirect to the tax settings page to adjust product price tax handling globally.
    • Sale Price: Enter a discounted price, if applicable, for promotions or sales.
    • Tax Price Excluded with product price (Change): Clicking on ‘Change’ will redirect to the tax settings page to adjust product price tax handling globally.
    • Short Description: Provide a brief summary of the product’s highlights.
    • Long Description: Provide a detailed description of the product, including features, benefits, and any other relevant information.
    • Upload Product Images: Drag-and-drop or browse to upload one or more images for the product.
    • Upload Product Video: Click ‘Choose File’ to upload a video related to the product.
    • Save & Continue: Click to add this new product to the list. A toast notification ‘Added Simple Product Successfully’ will appear to confirm the new addition.

    The below are the fields in the second page:

    Product Inventory

    • Product SKU: Enter a unique code used for tracking and identification of the product.
    • Stock Quantity: This is a spinner input field. Enter the current available inventory of the product by typing or using the up/down arrows.
    • Low Stock Limit: This is a spinner input field. Enter the threshold quantity at which notification must be sent about low stock by typing or using the up/down arrows.
    • Track Quantity: Check this box to enable tracking of the product’s quantity.
    • Continue selling when out of stock: Check this box if customers must be allowed to purchase the product even when it’s out of stock.
    • Barcode: Manage the product barcode. A form modal titled ‘Barcode’ will appear with the dropdown list form field titled ‘Select Update Barcode Options’ with the below mentioned dropdown list options:
      • Enter or Scan Barcode: Manually input an existing barcode number or use a barcode scanner to enter it.
      • Upload Barcode Image: Upload an image file of an existing barcode.
      • Generate New Barcode: Auto-generated barcode that is unique is available for download.
    • Cancel: Clicking this button will close the ‘Barcode’ modal dialog box without saving any changes.
    • Save: Click to add this barcode. 
    • Add inventory: Click this button to add more stock to the product’s inventory.
      • Locations: Lists active inventory locations managing stock. Multiple locations can be added and removed using the input field and the remove (×) icon.
      • Add New Location: Allows entry of a new stock location. Enter the location name and click ‘Save’ to add it to the list.
      • Quantity: Displays inventory data categorized by location. Each row in the table shows inventory metrics for the corresponding location. The table includes the following column headers:
        • Locations: Name of the inventory location.
        • Incoming: Quantity of stock currently inbound to the location.
        • Committed: Quantity of stock reserved or allocated to customer orders.
        • Available Stock: Quantity of stock available for purchase and immediate fulfillment.
        • Status:
        • Action: A modal dialog box titled ‘Store Location’ will appear with the below mentioned form fields:
          • Add Store Information: A modal dialog box titled ‘Store Location’ will appear with the below mentioned form fields:
          • Enter Location Name: Enter the name or identifier of the store location.
          • Enter Quantity: Enter the numerical quantity associated with this location.
          • Close: Click to exit without saving any changes.
          • Submit Information: Save the information and closes the dialog box
          • Continue: Click to proceed to the next form section.
    • Include Pincodes: Enter the pincode for product delivery. As characters are typed, a validation message ‘Please enter 3 or more characters’ will guide the provision of a sufficient number of characters for valid pincode search or entry.
    • Exclude Pincodes: Enter pincode not serviced for product delivery. As characters are typed, a validation message ‘Please enter 3 or more characters’ will appear, indicating the minimum number of characters required for entry or search.

    Product Shipping Details

    • Shipping Cost: Enter the delivery charges associated with the product.
    • Weight (kg): Enter the product’s total weight. Select the unit of weight (KG, GMS, LBS) from the dropdown.
    • Dimensions (cm): Specify the length, width, and height of the product in centimeters.
    • Save & Continue: Click to add this new product to the list. A toast notification ‘Product Inventory and Shipping Data Updated Successfully’  will appear to confirm the new addition.

    The below are the fields in the third page:

    Meta Details 

    • Meta Title: Sets the title shown in browser tabs and search engine results.
    • Allow Search Results? (Optional): Specifies search engine indexing behavior for the product page. Use the following settings to control visibility in search engine listings:
      • Yes (Default): The product page will be visible in search engine results.
      • No: Prevents the product page from appearing in search engine results.
    • Search Follow (Optional): Determines search engine crawling behavior for links on the product page. Use the following setting to control if search engines follow links.
      • Yes (Default): Allows search engines to follow internal and external links on the product page.
      • No: Prevents search engines from following any links on the product page.
    • Meta Keywords (Optional): Defines keywords relevant to the product.
    • Meta Description: Compelling summary intended to appear in search engine results.
    • Canonical URL: Specifies the original or preferred URL.

    Additional Details

    • Trending: Marks the product as trending to highlight it on the storefront.
      • Yes: Highlights the product in the Trending section (if configured).
      • No: The product will not appear in trending-specific sections.
    • Product Status: Controls the visibility of the product on the storefront.
      • Publish: Makes the product live and visible to customers.
      • Draft: Saves the product as a draft without making it publicly accessible.
    • Link Products: Allows linking of related products to promote upselling and cross-selling.
    • Upsell Products (Optional): Assigns higher-value or upgraded alternatives to the current product.
      • Enter the product name to select from existing catalog items.
      • Multiple products can be added as upsells.
    • Cross Sell Products (Optional): Specifies complementary products often purchased together. 
      • Enter the product name to select from existing catalog items.
      • Multiple products can be added as cross-sells. 

    Product Feed

    In the top-right corner, click the ‘Add Additional Feed’ button to configure feed-related details for product distribution.

    • Hide from the Feed: Determines if the product is excluded from appearing in the product feed. The following options control this setting:
      • No (Default): Includes the product in the feed.
      • Yes: Excludes the product from the feed.
    • Availability: Defines the current stock status of the product for listing and feed purposes. The following options are available:
      • In Stock: The product is available for immediate purchase and fulfillment.
      • Available for Order: The product is not currently in stock but can still be ordered and will be shipped once available.
      • Pre-Order: The product has not yet been released but can be reserved in advance by placing an order.
      • Out of Stock: The product is currently unavailable for purchase and cannot be ordered.
    • Condition: Indicates the physical state of the product for listing and feed classification. The available options include:
      • New: The product is brand new, unused, and in original packaging.
      • Refurbished: The product has been restored to a like-new condition by the manufacturer or a certified provider.
      • Used: The product has been previously owned or used, and may show signs of wear.
    • Product Type: Defines the internal classification hierarchy of the product. 
    • Google Product Category: Selects a category from the official Google product taxonomy to enhance feed accuracy and third-party integration.
    • Brand: Specifies the manufacturer or brand name associated with the product.
    • Delivery Label: Indicates the shipping profile or method associated with the product in the feed.
    • Add Feed: Click to submit the current product feed settings. A toast notification ‘Product Feed Added Successfully’ will appear to confirm the addition of a new feed.

    Add Additional Feed

    In the top-right corner, click ‘Add Additional Feed’ button to collect or display extra information about a product that is not part of the default product form.

    • Adding Additional Fields: Only fields already added will appear here, this section does not include any input elements for creating new fields. Follow the steps mentioned below to create a new product field.
      • Go to the sidebar and click on ‘Product Additional Fields’ under ‘Products’.
      • Click the ‘+ Product Additional Fields’ button at the top-right corner of the page.
      • A modal form  labeled ‘Add New Product Additional Fields’ will open for input.
      • Fill in the required information to define the custom fields.
      • Click to ‘Submit’ to save the field. A toast notification ‘Product Additional Field Values Added Successfully’ will appear to confirm the addition. After saving, the new field will:
        • Appear on the downloadable product creation page.
        • Appear on the storefront for customers to view.
    • Complete: Click to save your updates. A toast notification ‘Product Additional Settings Updated Successfully’ will appear upon saving. The next section  presents a consolidated display of all product information in one place.

    These settings help create a clear and complete product listing for your store. Ensure all product information is filled correctly and saved before moving to the next configuration sections.

    Here are the setup links for adding Variable and Downloadable products:
  • Low Stock Alerts 

    Low Stock Alerts help administrators and store managers receive automated email notifications whenever a product’s available stock reaches a specified low quantity threshold. This ensures timely replenishment and prevents products from going out of stock on the storefront.

    Draft Low Stock Alert Email Content

    This must be configured before enabling email alerts.

    • Navigate to the sidebar menu and click ‘Settings’.
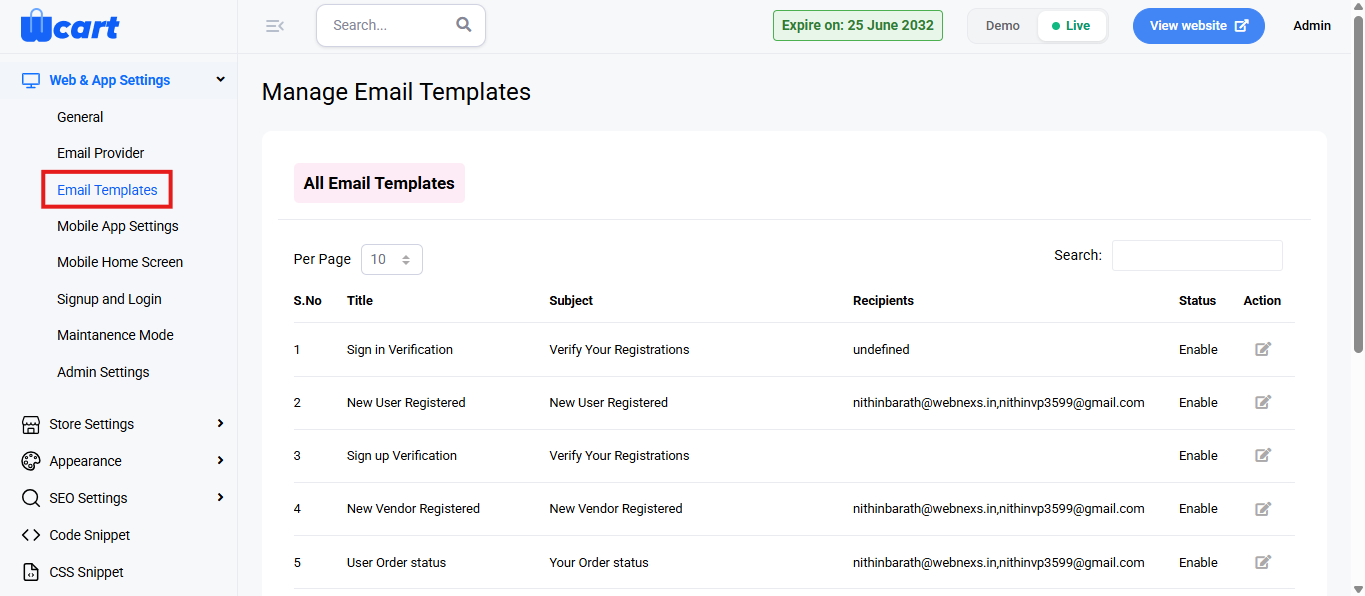
    • Under ‘Web & App Settings’ select ‘Email Templates’.
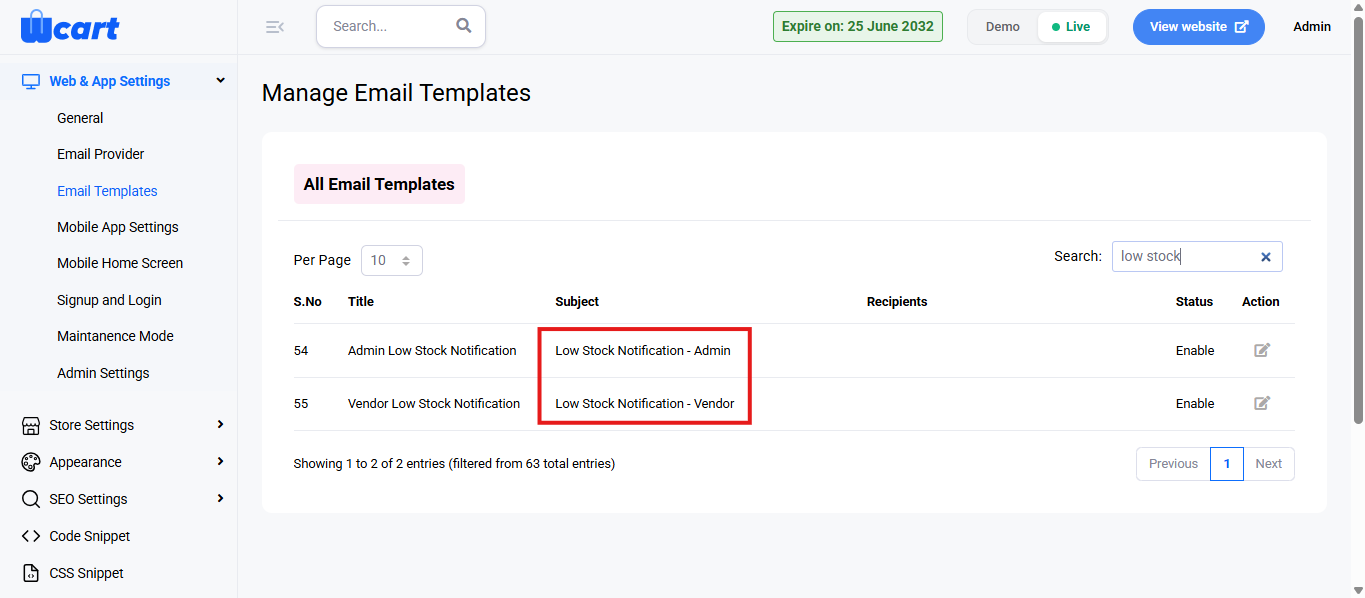
    • Look for the Low Stock Alert email template and update it as required. You can customize the email content for both Admins and Vendors, which are provided as separate templates.
    • The available sections to update are as follows:
      • Subject – Title of the alert email
      • Message Body – Text displayed inside the email
    • After editing:
      • Click Update Template
      • A confirmation message will appear

    This ensures email recipients receive meaningful and formatted notifications.

    Configure Email Sender Service

    Low Stock Alerts cannot be sent unless an email service provider is selected.

    • Navigate to the sidebar menu and click ‘Settings’.
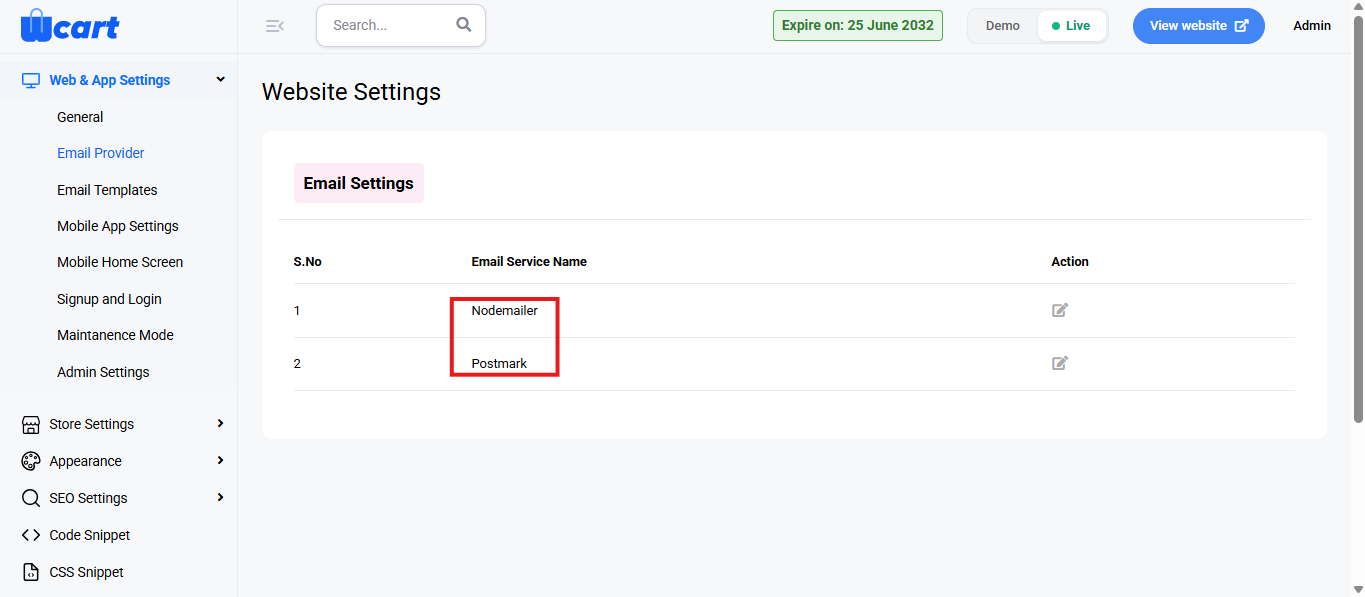
    • Under ‘Web & App Settings’ select ‘Email Provider’.

    You will see two options in the table:

    Option A: Nodemailer

    • Select Nodemailer
    • Enter SMTP details as required:
      • Host
      • Port
      • Username
      • Password
    • Enable the service if disabled

    Used when sending emails through your own SMTP / hosting provider.

    Option B: Postmark

    • Select Postmark
    • Enter:
      • Server Token
      • Sender Email
    • Enable the service

    Recommended for high-delivery transactional emails.

     Only one email service can be active at a time.
    Select the provider you prefer and ensure it is enabled.

    Enable Low Stock Notification in Store Settings

    Navigate to:
    Store Settings → Inventory Settings

    • Locate Low Stock Notification
    • Tick the checkbox to enable alerts
    • Enter the Recipient Email Address
      • You may enter one or multiple addresses (depending on system support)
    • Save Settings after enabling

    Now the system knows who should receive the alerts.

    How Low Stock Alerts Work After Activation

    Once all 3 setup steps are completed:

    Stock levels are continuously monitored and when a product reaches the defined low stock threshold, an automatic email alert is triggered and sent to the assigned recipient(s).

    Typical information included in each alert:

    • Product Name
    • SKU
    • Available Quantity
    • Timestamp of alert

    This gives teams enough time to re-order or restock the product.

    These settings ensure low stock alerts are properly delivered to responsible staff, helping prevent stockouts and operational disruptions. Make sure the Low Stock Alert email template is configured, an active email service provider is selected, and correct recipients are assigned so that notifications work without interruption.

    Maintaining these configurations enables proactive stock monitoring and timely restocking for smooth business operations.

  • Abandoned Cart – Email Settings, Email Template & Email Logs

    Tracks abandoned shopping carts and helps in recovering lost sales by reminding users via email or notifications. From the Abandoned Cart navigation tabs, this section covers ‘Email Settings’, ‘Email Template’ and ‘Email Logs’.

    To configure, follow these steps:

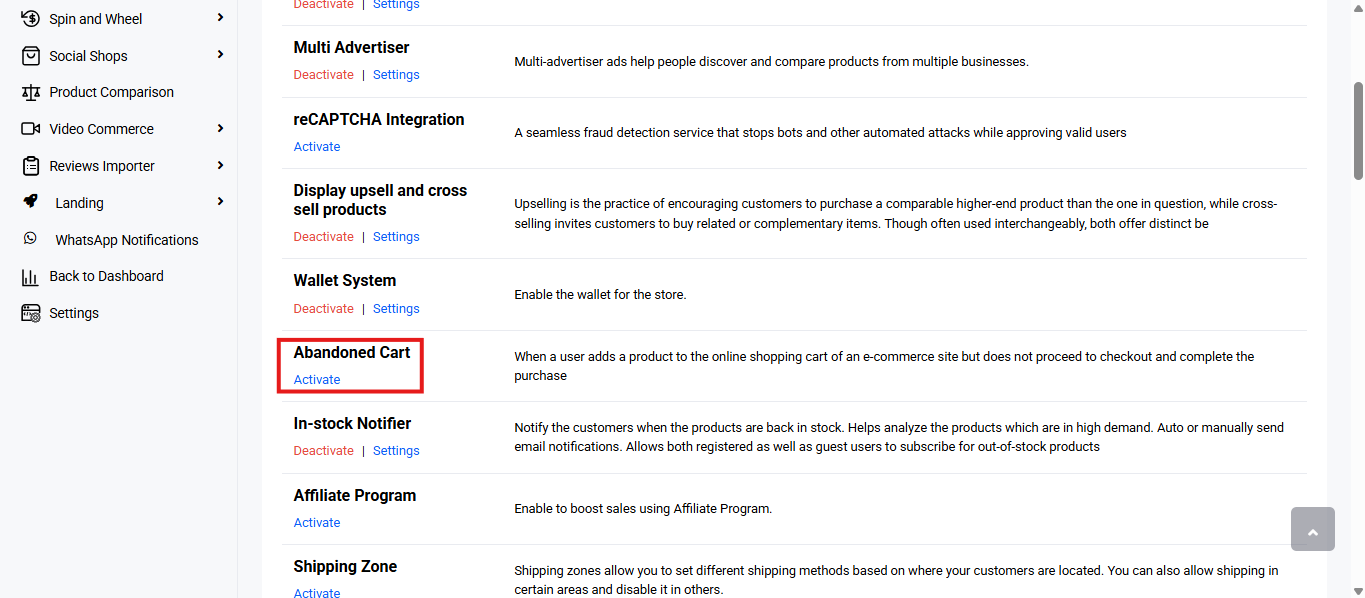
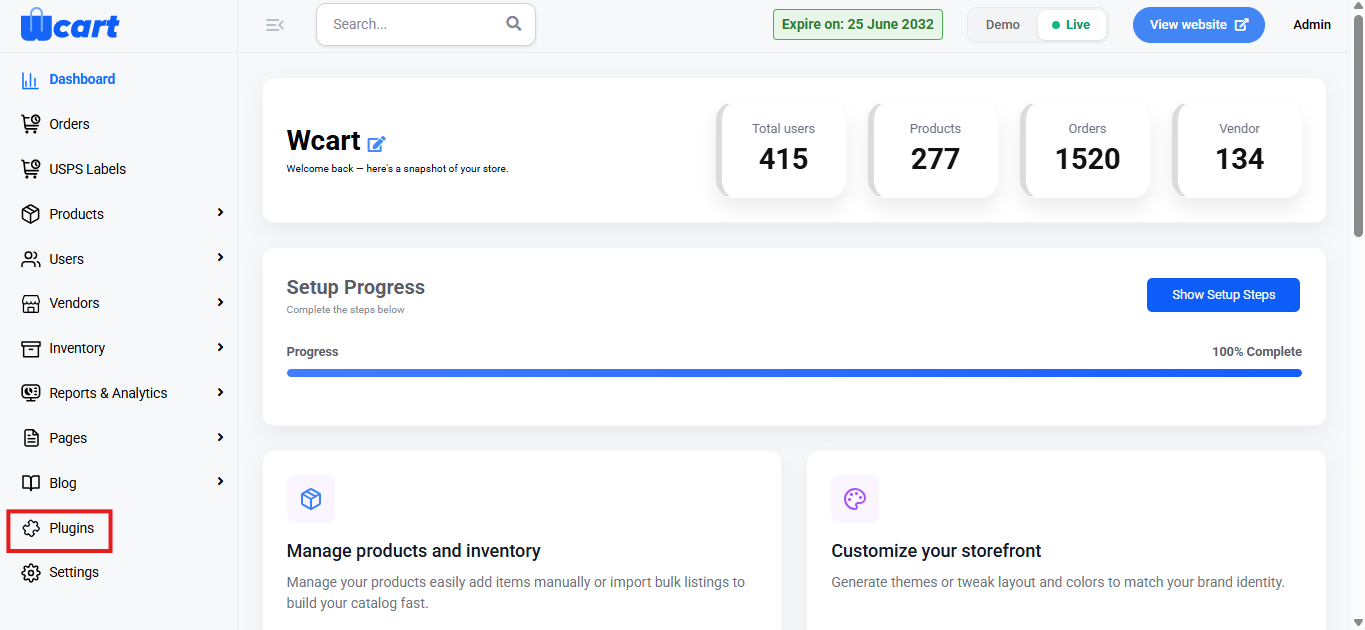
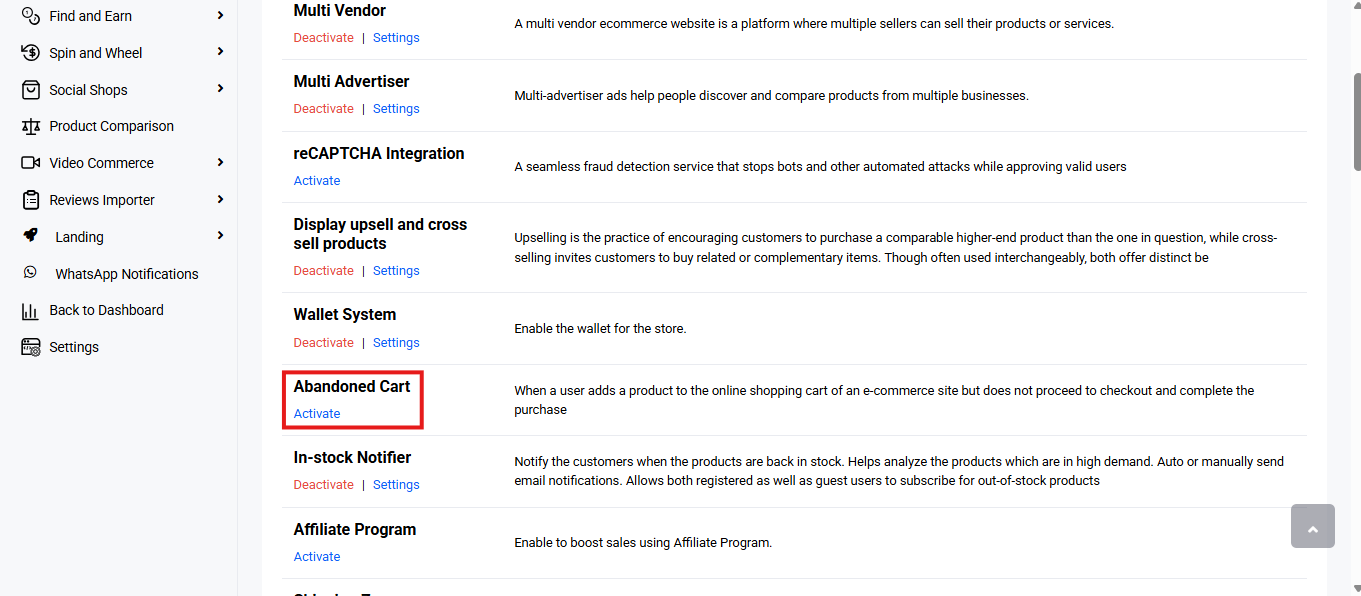
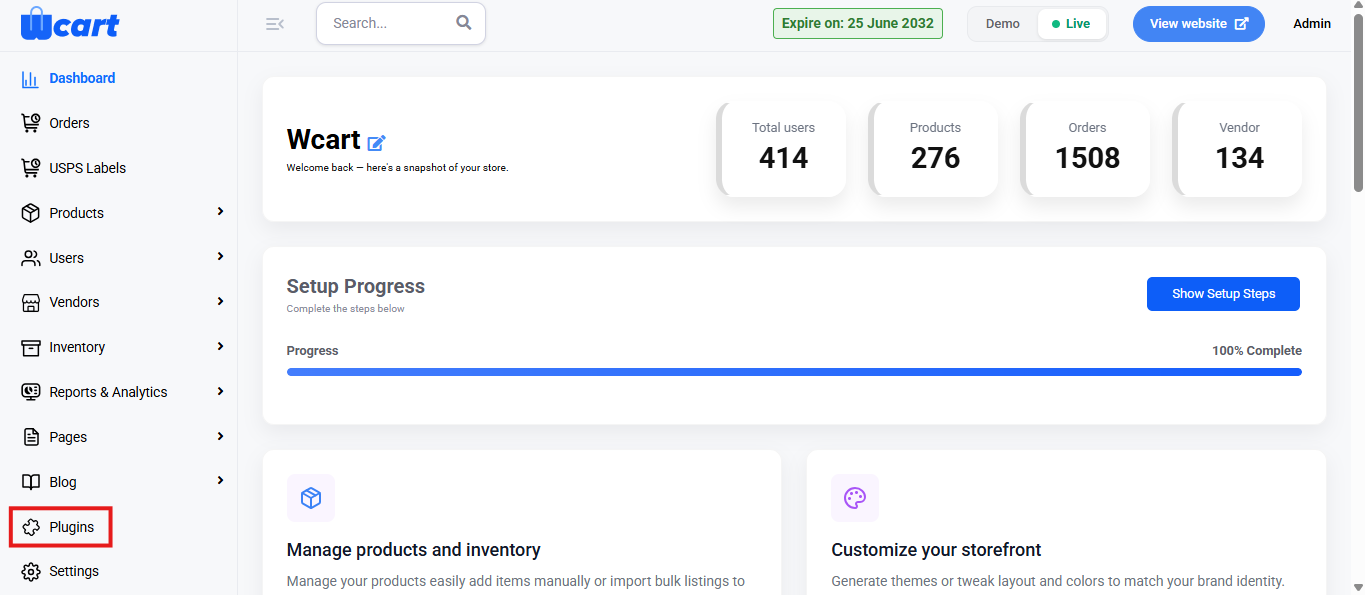
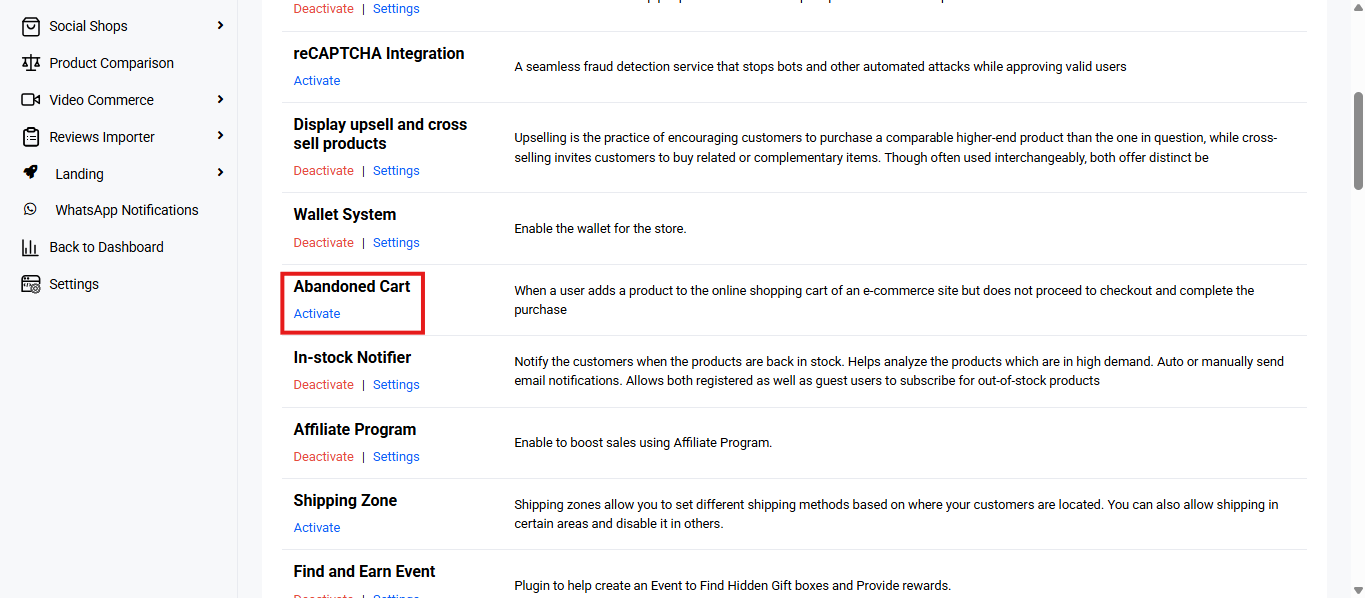
    • Navigate to the sidebar menu and select ‘Plugins’.
    • Locate ‘Abandoned Cart’.
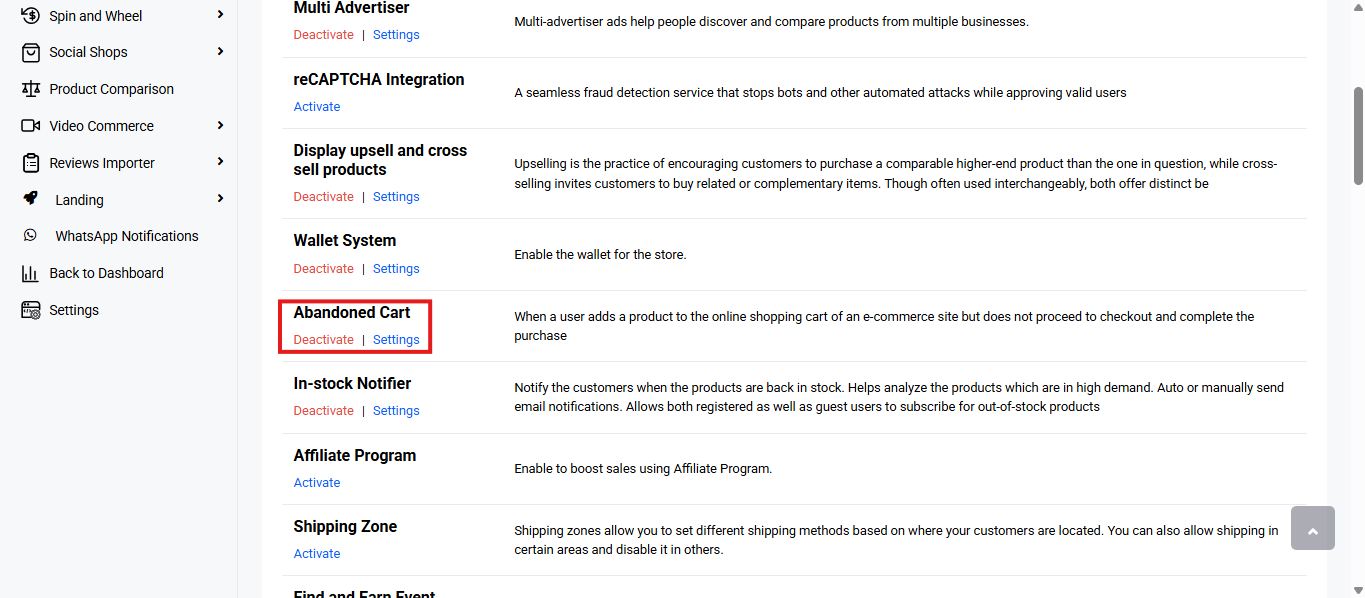
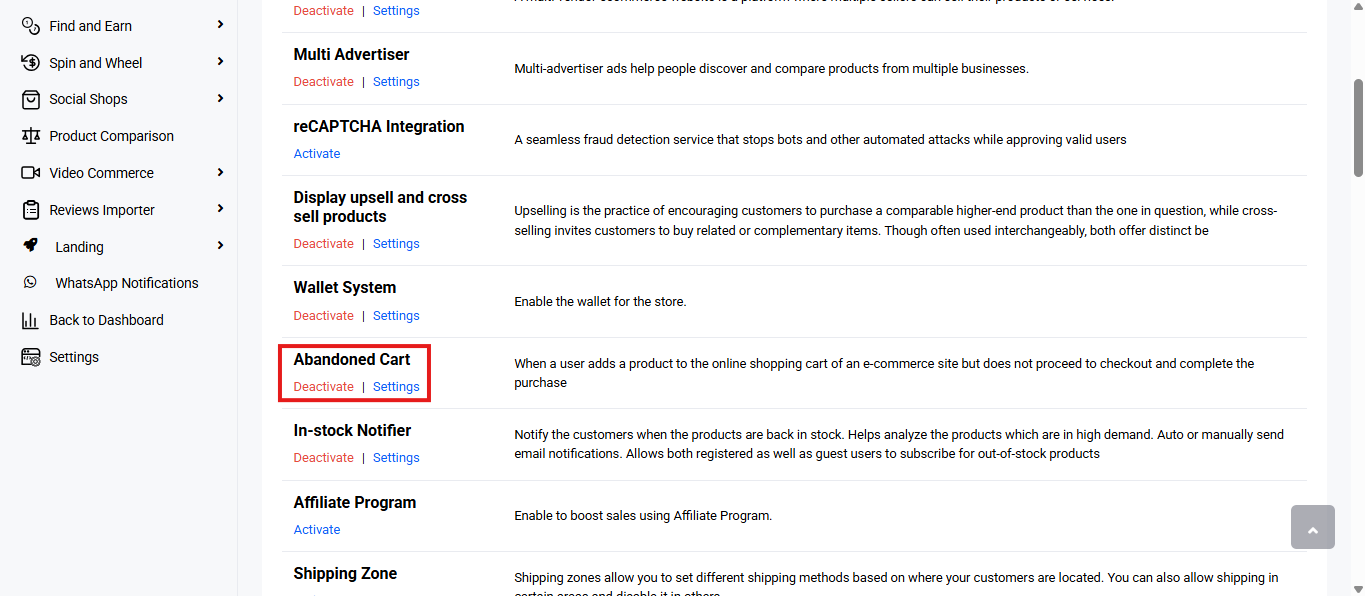
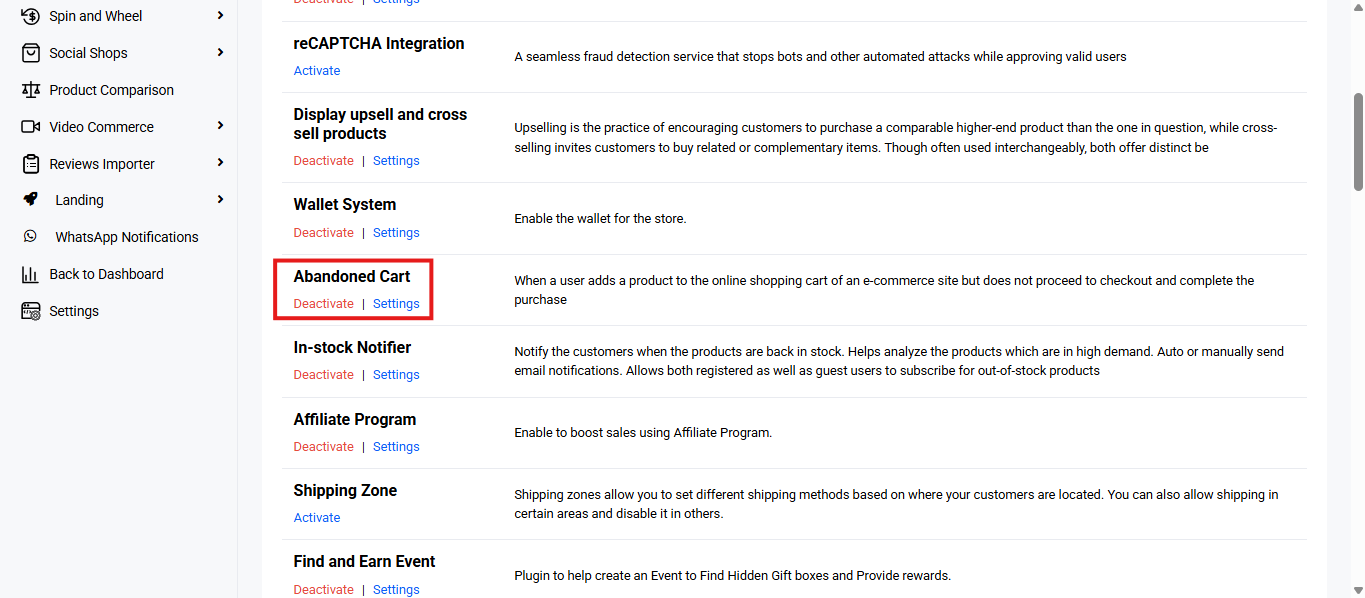
    • Click ‘Activate’. You will now see two options: ‘Deactivate’ and ‘Settings’. When you click ‘Activate’ or ‘Deactivate’, a toast notification showing ‘Abandoned Cart Plugin Activated’ or ‘Abandoned Cart Plugin Deactivated’ will appear to confirm that the plugin has been activated or deactivated. You can configure the Abandoned Cart settings by clicking ‘Settings’ or by selecting ‘Abandoned Cart’ from the left sidebar menu after activation.
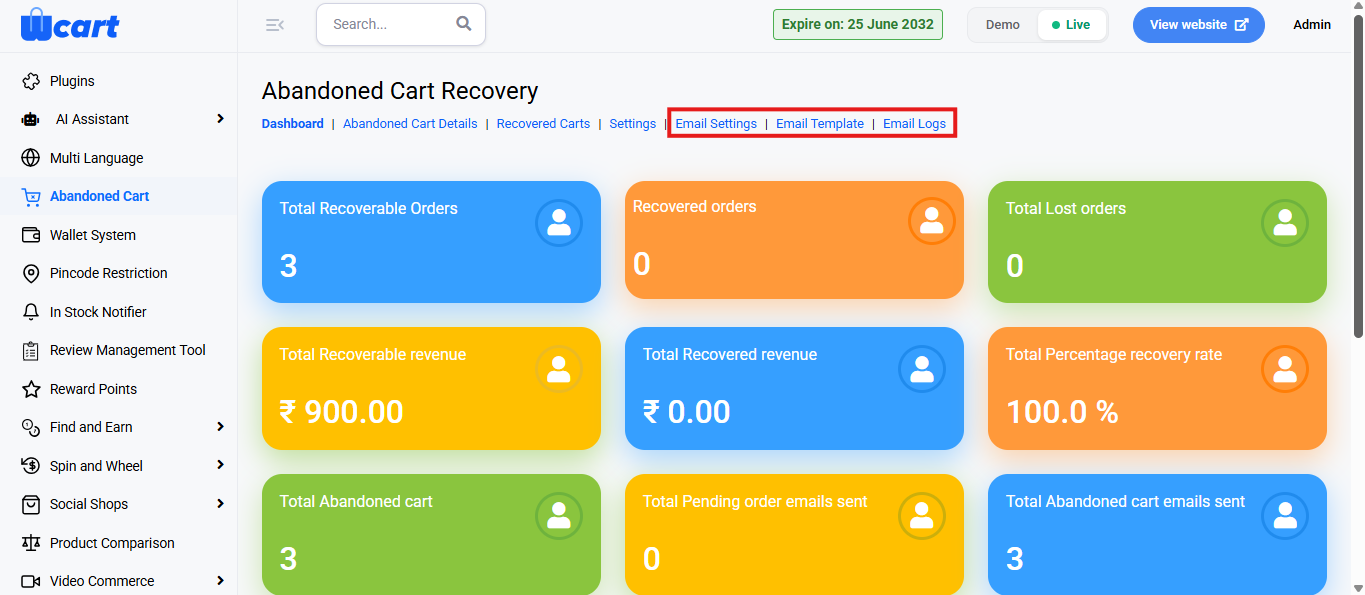
    • From the navigation tab, select ‘Email Settings’ or ‘Email Template’ to configure or ‘Email Logs’ to view the email content.

    Email Settings

    Configure and automate the sending of recovery emails to users that have abandoned their carts.

    Click ‘Add Mail’ at the top right corner to add new mail templates. A modal dialog box will appear with the following input fields:

    • Email Template Name: Enter a recognizable name.
    • Enter Subject: This will be the subject line of your email.
    • Enter Template: Use the rich text editor to write messages. 
    • Close: Closes the box without saving.
    • Save Template: Saves the email template for future use.

    Below the ‘Add Mail’ option you will find a table with various columns to interpret the email templates data quickly and accurately. The columns are listed below:

    • S.No: Serial number for reference.
    • Template Name: Name of the email template.
    • Subject: Subject line of the email.
    • Content: Email body content shown in preview.
    • Action: 
    • Edit: The same modal dialog box in the ‘Add Mail’ section will appear, the fields can be edited and updated.
    • Delete: 

    Email Logs

    This section displays a report of email activity maintained within the platform.

    Export 

    Click Export to download the report.

    File Types Available:

    • CSV
    • Excel

    Choose a format and click Export to download.

    You will find a table with various columns to interpret email logs data quickly and accurately. The columns are listed below:

    • S.No: Displays the serial number of the email log entries.
    • Subject: Shows the subject line of the sent email.
    • Send to: Indicates the recipient’s email address.
    • Status: Reflects the email delivery status.
    • Success: The email was successfully sent and delivered to the recipient’s mail server.
    • Failed: The email could not be delivered to the recipient.
    • Send Date: The date the email was sent.
    • Content: Clicking the eye icon allows you to view the content of that specific email.the popup shows the following information:
    • Subject: Displays the email subject line.
    • Content: Displays the main body of the email message. 
    • Close Button: Click Close to exit the popup without making changes.

    Together, Email Settings, Email Templates, and Email Logs streamline recovery emails, ensure consistent messaging, and provide full visibility into email performance.

    Links to other Abandoned Cart navigation tabs:

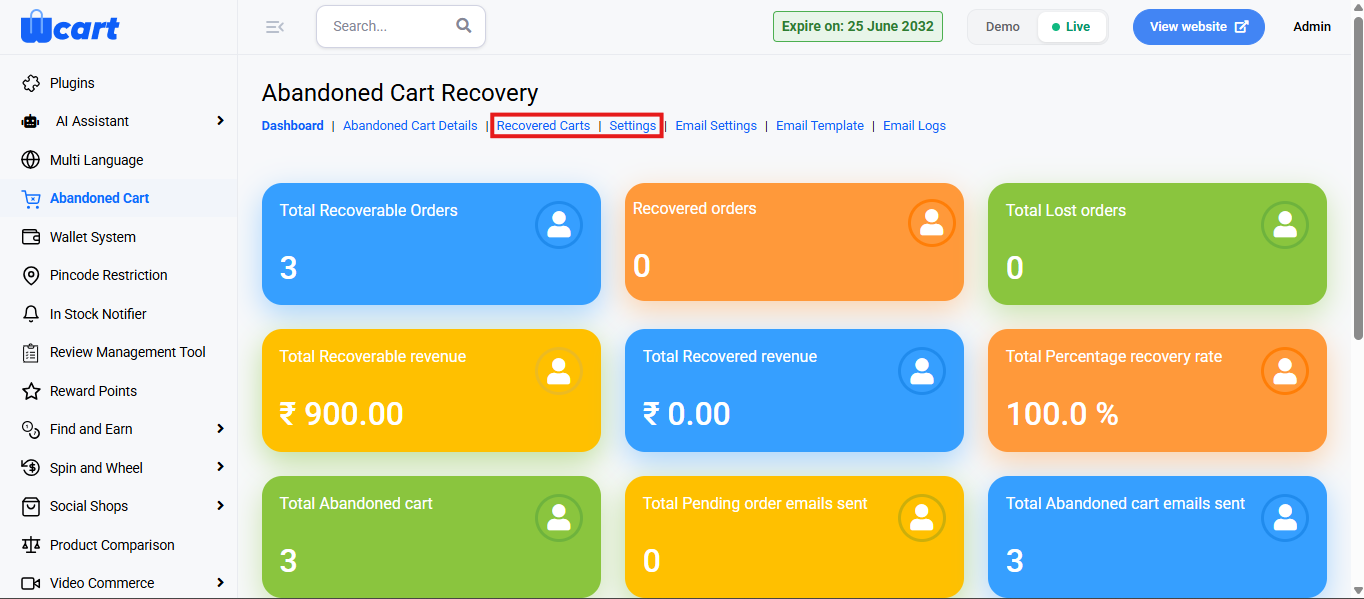
  • Abandoned Cart – Recovered Carts & Settings

    Tracks abandoned shopping carts and helps in recovering lost sales by reminding users via email or notifications. From the Abandoned Cart navigation tabs, this section covers Recovered Carts and Settings.

    To configure, follow these steps:

    • Navigate to the sidebar menu and select ‘Plugins’.
    • Locate ‘Abandoned Cart’ and click ‘Activate’. You will now see two options: ‘Deactivate’ and ‘Settings’. When you click ‘Activate’ or ‘Deactivate’, a toast notification showing ‘Abandoned Cart Plugin Activated’ or ‘Abandoned Cart Plugin Deactivated’ will appear to confirm that the plugin has been activated or deactivated. You can configure the Abandoned Cart settings by clicking ‘Settings’ or by selecting ‘Abandoned Cart’ from the left sidebar menu after activation.
    • From the navigation tab, select Recovered Carts or Settings to configure.

    Recovered Carts

    Tracks and manages successfully recovered abandoned cart orders.

    You will find a table with various columns to interpret recovered carts data quickly and accurately. The columns are listed below:

    • S.No: Serial number of the entry.
    • Order ID: Unique identifier of the recovered order.
    • User Name: Name of the customer who completed the purchase.
    • Product Name: Name of the product(s) recovered in the order.
    • Quantity: Total quantity of items in the recovered cart.
    • Date: Date when the cart was recovered and converted into an order.
    • Total Amount: Final value of the recovered cart order.

    Settings

    Configure the logic for identifying and recovering abandoned carts.

    • Enable Cart Recovery: A checkbox to activate the abandoned cart recovery system.
    • Checked: Enables the tracking and recovery of abandoned carts.
    • Unchecked: Disables the feature.
    • Identify a Cart as Abandoned After: A time-based rule that defines when a cart should be considered abandoned. Enter the number of minutes after which an inactive cart is marked as abandoned.
    • Save Changes: Click to save the update. A toast notification ‘Update Success’ will appear to confirm the update.

    The Recovered Carts tab provides a detailed view of successfully recovered orders, while the Settings tab lets you configure recovery rules and preferences. Together, they enable effective tracking and management of abandoned cart recovery.

    Links to other ‘Abandoned Cart’ navigation tabs:

  • Abandoned Cart – Dashboard & Abandoned Cart Details 

    Tracks abandoned shopping carts and helps in recovering lost sales by reminding users via email or notifications.

    To configure, follow these steps:

    • Navigate to the sidebar menu and select ‘Plugins’.
    • Locate ‘Abandoned Cart’ and click ‘Activate’. You will now see two options: ‘Deactivate’ and ‘Settings’. When you click ‘Activate’ or ‘Deactivate’, a toast notification showing ‘Abandoned Cart Plugin Activated’ or ‘Abandoned Cart Plugin Deactivated’ will appear to confirm that the plugin has been activated or deactivated. You can configure the ‘Abandoned Cart’ settings by clicking ‘Settings’ or by selecting ‘Abandoned Cart’ from the left sidebar menu after activation.

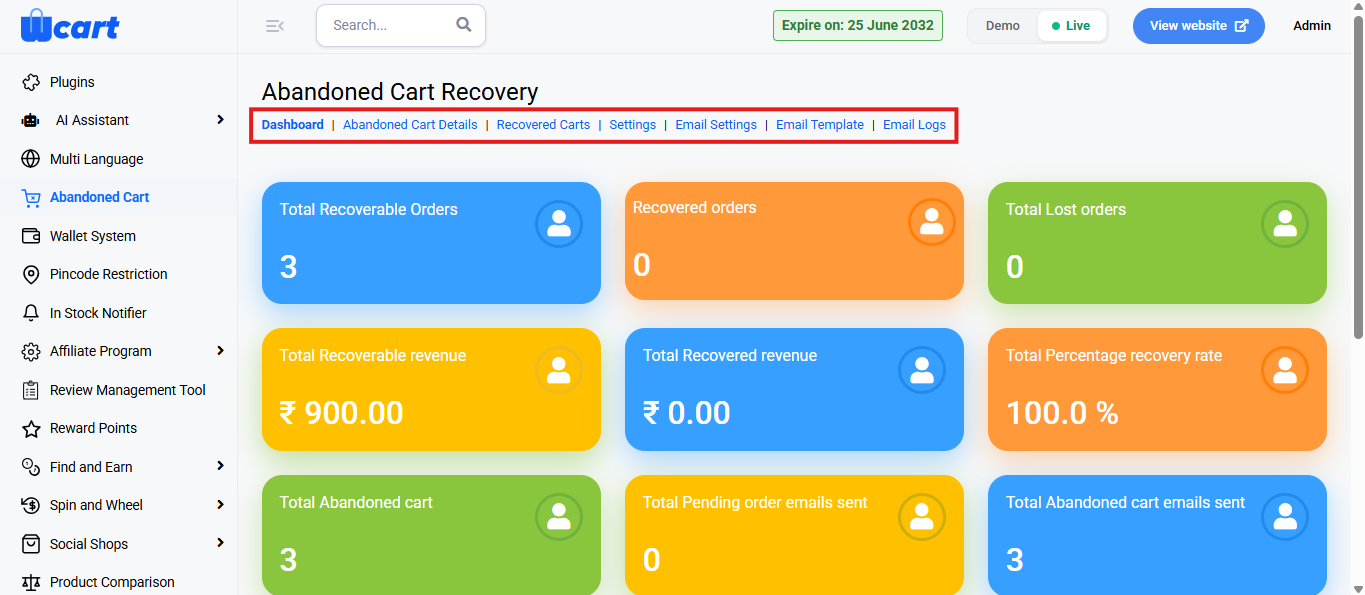
    This module contains multiple navigation tabs at the top, each leading to a different section for managing and tracking recovery efforts.

    The tabs include:

    • Dashboard 
    • Abandoned Cart Details
    • Recovered Carts
    • Settings
    • Email Settings
    • Email Template
    • Email Logs

    In this section, Dashboard and Abandoned Cart Details are explained. The other navigation tabs are detailed on other pages. The links for those are given at the end of this section.

    Dashboard: Each colored card presents a key performance indicator related to abandoned cart activity:

    • Total Recoverable Orders: Number of carts with potential for recovery, left unfinished by users adding items but not completing checkout.
    • Recovered Orders: Number of orders that were successfully recovered after abandonment through follow-ups or email reminders.
    • Total Lost Orders: Count of abandoned orders that were not recovered within a set period or attempt limit.
    • Total Recoverable Revenue: Monetary value (in ₹) associated with recoverable abandoned carts.
    • Total Recovered Revenue: Amount (in ₹) actually recovered from abandoned carts that converted into successful orders.
    • Total Percentage Recovery Rate: Indicates the effectiveness of recovery campaigns as a percentage.
    • Total Abandoned Cart: Total number of shopping carts that were abandoned by users before completing a purchase.
    • Total Pending Order Emails Sent: Number of recovery emails sent specifically for pending (unconverted) orders.
    • Total Abandoned Cart Emails Sent: Total number of abandoned cart emails sent to users in an attempt to recover their carts.

    Latest Mail Reports

    A table displaying the most recent abandoned cart recovery email communications.

    • User Name: Name of the user to whom the recovery email was sent.
    • Mail ID: Email address of the recipient.
    • Last Mail: Date on which the last recovery email was sent to the user.

    Latest Recovered Carts

    Displays a log of recently recovered carts, including:

    • Product Name: Displays the name of the product that was in the recovered cart.
    • User Name: Shows the name of the user who successfully completed the purchase after cart recovery.
    • Recovered Date: Indicates the date on which the abandoned cart was recovered and converted into an order.

    Abandoned Cart Details 

    Shows users that left items in their cart, enabling follow-up actions to recover sales.

    You will find a table with various columns to interpret abandoned cart recovery data quickly and accurately. The columns are listed below:

    • S.No: Serial number indicating the row index.
    • Name: Name of the customer who abandoned the cart.
    • Email: Email address to which the recovery mail will be sent.
    • Actions: Provides two options for managing the abandoned cart:
    • View: Opens a modal dialog box  titled ‘View Abandoned Cart Details’ with the following column headers:
    • Product Image: Thumbnail of the product.
    • Product: Name or title of the product.
    • Product Price: Price of a single unit of the product.
    • Quantity: Number of units the user added to the cart.
    • Total: Total value for that product (price × quantity).
    • Close: To return to the list.
    • Tick: Opens a modal dialog box titled ‘Send Mail’ that displays the confirmation message ‘do You Want To Send Mail?. Includes two buttons:
    • Yes: Confirm and send the mail
    • No: Cancel the action

    The Dashboard provides key metrics at a glance, while the Abandoned Cart Details tab offers a detailed view of each abandoned cart. Together, they enable quick insights and effective recovery actions.

    Links to other Abandoned Cart navigation tabs:

  • Managing Refunds and Returns

    This section helps administrators configure and manage all refund, return, exchange, and cancellation rules for their store. With these settings, you can define eligibility criteria, set limits, enable reasons and attachments, and ensure a smooth post-purchase experience for customers.

    To configure, follow these steps:

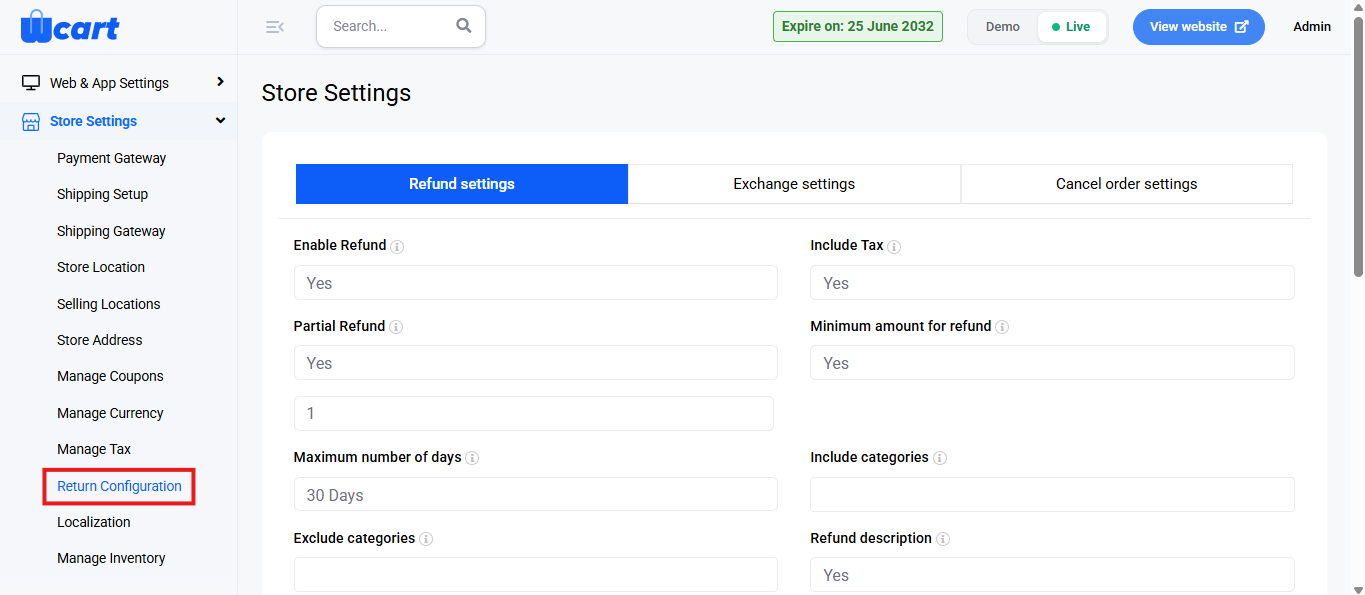
    • Go to the Dashboard and select ‘Settings’ from the sidebar menu.
    • Again, from the sidebar menu click ‘Store Settings’.
    • Now click ‘Return Configuration’ to open the configuration page.

    Refund Settings 

    • Enable Refund: Enables or disables the refund feature.
    • Options: Yes / No
    • Include Tax: Decides whether the tax amount should be included in the refund.
    • Options: Yes / No
    • Partial Refund: Allows refunding part of the order amount instead of the full value.
    • Options: Yes / No
    • Minimum amount for refund: Enables the store to set a minimum value below which refunds cannot be initiated.
    • Options: Yes / No
    • Maximum number of days: Defines the maximum number of days from the purchase date within which the refund can be requested.
    • Include categories: Enter product categories to include in the refund policy.
    • Exclude categories: Enter product categories to exclude from refund eligibility.
    • Refund Description: Enables a text field where customers can describe the reason for the refund.
    • Options: Yes / No
    • Enable Reason: Allows users to select a reason for refund from predefined values.
    • Options: Yes / No
    • Enter Reasons: Tags representing pre-filled refund reasons that customers can choose from.
    • Enable Attachment: Allows customers to attach files to support their refund request.
    • Options: Yes / No
    • Attachment Limit: Sets the maximum number of attachments a user can upload.
    • Refund Policy Description: A rich-text editor to add a detailed description of your store’s refund policy. This will be visible to customers.
    • Submit: Saves the refund settings. A toast notification such as ‘Refund Settings Updated’ will appear to confirm the update.

    Exchange Settings

    Enable Exchange: Enables or disables the exchange feature.

    Options: Yes / No

    Include Tax: Decides whether the tax amount should be included in the exchange calculation.

    Options: Yes / No

    Partial Exchange: Allows exchanging part of the order instead of the entire order.

    Options: Yes / No

    Minimum Amount for Exchange: Enables the store to set a minimum value below which exchanges cannot be initiated.

    Options: Yes / No

    Maximum Number of Days: Defines the maximum number of days from the purchase date within which the exchange can be requested.

    Include Categories: Enter product categories to include in the exchange policy.

    Exclude Categories: Enter product categories to exclude from exchange eligibility.

    Enable Stock Management: Enables inventory management for exchanged items.

    Options: Yes / No

    Enable Shipment Cost: Enables applying shipment costs for exchanges.

    Options: Yes / No

    Accept Exchange Reasons Exclude: Allows specifying reasons that should be excluded from acceptable exchange reasons.

    Options: Yes / No

    Exchange Description: Enables a text field where customers can describe the reason for the exchange.

    Options: Yes / No

    Enable Reason: Allows users to select a reason for exchange from predefined values.

    Options: Yes / No

    Enter Reasons: Tags representing pre-filled exchange reasons that customers can choose from.

    Enable Attachment: Allows customers to attach files to support their exchange request.

    Options: Yes / No

    Attachment Limit: Sets the maximum number of attachments a user can upload.

    Exchange Policy Description: Text editor to add a detailed description of your store’s exchange policy. This will be visible to customers.

    Submit: Saves the exchange settings. A toast notification such as ‘Exchange Settings Updated’ will appear to confirm the update.

    Cancel Order Settings

    Enable Cancel: Enables or disables the order cancellation feature.

    Options: Yes / No

    Include Tax: Decides whether the tax amount should be included in the cancellation refund.

    Options: Yes / No

    Partial Cancel: Allows cancelling part of the order instead of the entire order.

    Options: Yes / No

    Minimum Amount for Cancel: Enables the store to set a minimum value below which cancellations cannot be initiated.

    Options: Yes / No

    Maximum Number of Days: Defines the maximum number of days from the purchase date within which the cancellation can be requested.

    Include categories: Enter product categories to include in the cancellation policy.

    Exclude categories: Enter product categories to exclude from cancellation eligibility.

    Cancel Description: Enables a text field where customers can describe the reason for the cancellation.

    Options: Yes / No

    Before Pickup: Allows cancellation only before the item is picked up for delivery.

    Options: Yes / No

    Enable Reason: Allows users to select a reason for cancellation from predefined values.

    Options: Yes / No

    Enter Reasons: Tags representing pre-filled cancellation reasons that customers can choose from.

    Cancel Policy Description: A rich-text editor to add a detailed description of your store’s cancellation policy. This will be visible to customers.

    Submit: Saves the cancel order settings. A toast notification such as ‘Cancel Settings Updated’ will appear to confirm the update.

    By setting up these refund, exchange, and cancellation options, you create a clear and reliable process for customers while maintaining full control over store operations. Review these settings regularly to keep your policies transparent, efficient, and aligned with your business workflow.

  • Setting Product Prices

    This section allows administrators to set and manage product pricing details. It includes fields to define both regular and sale prices, helping display accurate pricing and promotional offers on the storefront.

    You can configure prices from All Products, Vendor Products, Admin Products, or Add Products under the Products module.

    To configure using All Products, Vendor Products, or Admin Products, follow these steps:

    1. Navigate to the sidebar menu and select Products.
    2. Choose one of the following options: All Products, Vendor Products, or Admin Products.
    1. In the product list, locate the product you want to update the price for.
    2. Click the Edit icon under the Action column.
    3. Proceed to the first page of the configuration to modify and save your pricing details.
    4. In the pricing section, enter the Regular Price and Sale Price for the product as needed.

    To set prices for a new product, follow these steps:

    1. Navigate to the sidebar menu and find the Products section.
    2. Click Add Product.
    3. Select the desired Product Type from the dropdown and click Submit.
    4. Proceed to the pricing section on the first page of the configuration.
    5. Enter the Regular Price and Sale Price to define the standard and discounted product prices.

    In both scenarios, you will find the following form fields:

    Fields and Actions

    • Regular Price: Enter the standard product price displayed on the storefront.
    • Sale Price: Specify a discounted price to display promotional offers or limited-time discounts.
    • Save & Continue: Click to save your pricing updates. The following toast notifications will appear confirming the update based on the product type when you edit an existing product:
      • Updated Simple Product Successfully
      • Updated Variable Product Successfully
      • Updated Downloadable Product Successfully

    The below notifications will appear based on the product type if you are adding the price while creating a new product:

    • Added Simple Product Successfully
    • Added Variable Product Successfully
    • Added Downloadable Product Successfully

    These settings ensure accurate pricing is displayed for every product type. Review and update prices regularly to reflect promotions and maintain transparent, consistent pricing across your storefront.

  • Displaying Upsell & Cross-sell Products

    This section allows administrators to manage inventory and stock transfers between warehouse and store locations. It provides tools to track product quantities, update stock levels, and ensure accurate availability across the system. 

    To configure, follow these steps:

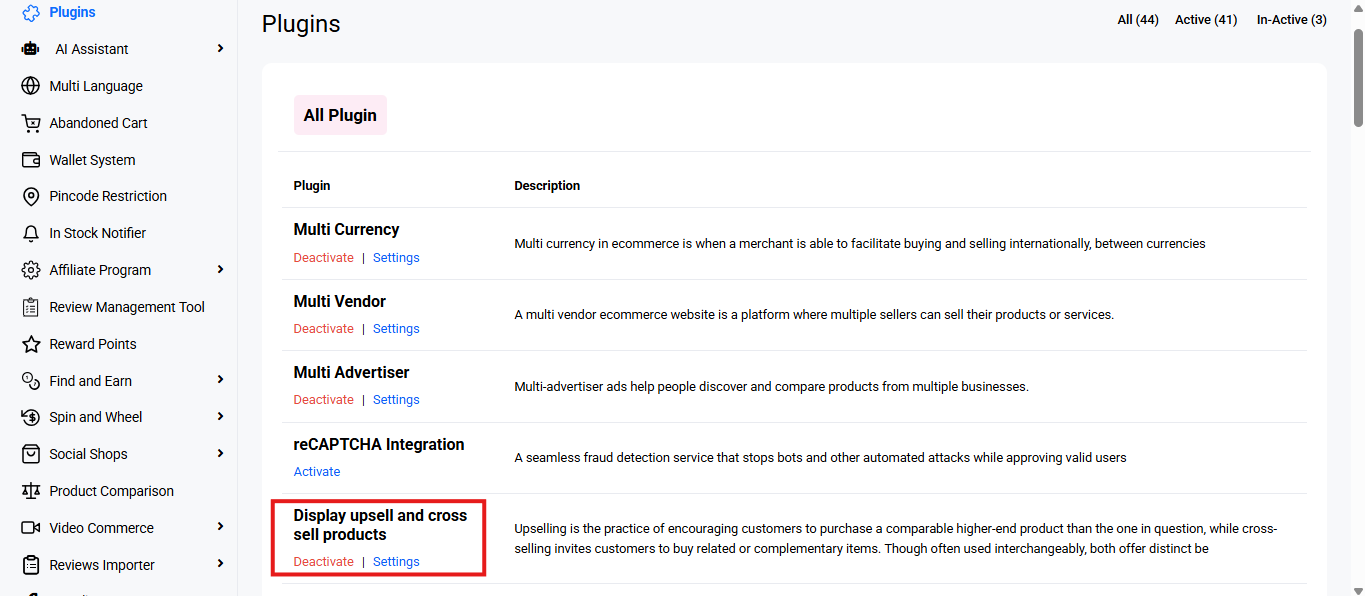
    • Navigate to the sidebar menu and select ‘Plugins’.
    • Locate ‘Display upsell and cross sell products’ and click ‘Activate’. You will now see two options: ‘Deactivate’ and ‘Settings’. When you click ‘Activate’ or ‘Deactivate’, a toast notification showing ‘Display Upsell and Cross-Sell Products Plugin Activated’ or ‘Display Upsell and Cross-Sell Products Plugin Deactivated’ will appear to confirm that the plugin has been activated or deactivated. You can now configure upsell and cross-sell products by clicking ‘Settings’ after activation.

    Clicking on Settings will open the configuration panel with the following fields:

    • Title: This field allows the admin to define a custom heading that will appear above the upsell or cross-sell product block on the frontend.
    • Status: The Status drop down determines whether the upsell or cross-sell block is enabled on the storefront. It provides two options:
      • Yes: Activates the section and displays the configured product suggestions to users.
      • No: Deactivates the section, and the suggestions will not be shown.
    • Description: Enter a short description that appears below the title on the frontend.
    • Complete: Clicking on ‘Complete’ saves the changes made to the active tab (either Upsell or Cross Sell). Toast notification ‘Update Upsell Product Settings’ and ‘Update Cross Sell Product Settings’ will appear to confirm the update.

    These settings ensure customers can subscribe for restock alerts and receive timely notifications when their desired products are available again. Always click Submit in each section to save your changes and confirm updates via the toast message.

  • In Stock Notifier 

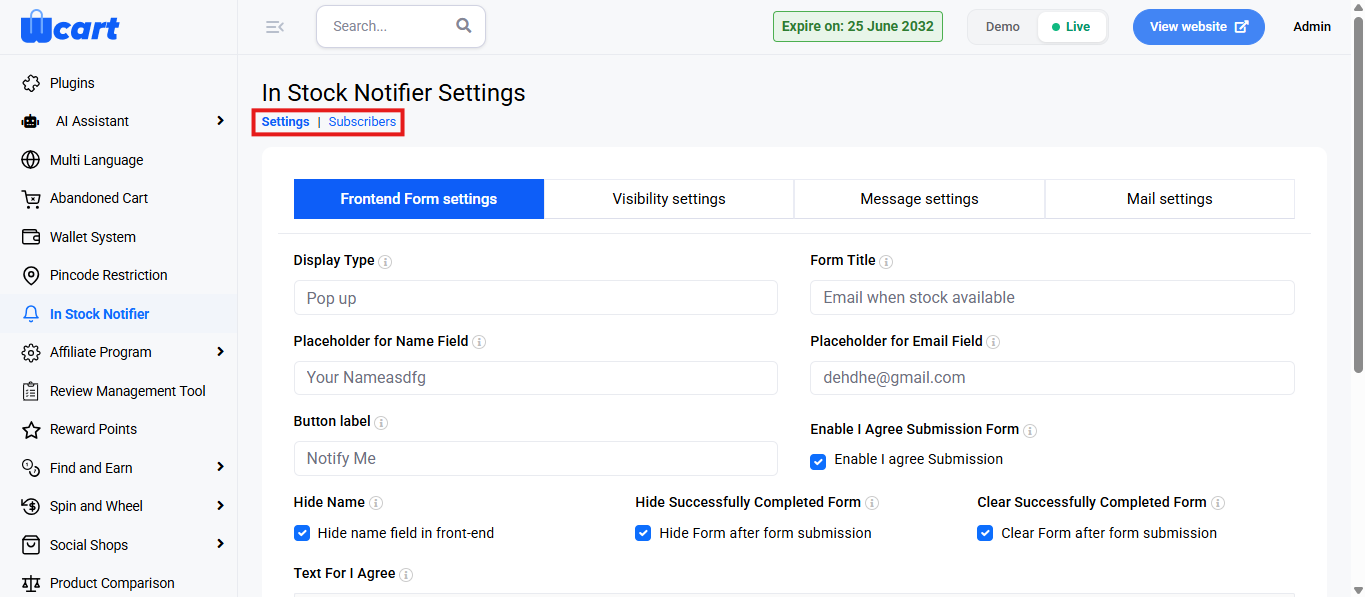
    The In Stock Notifier module includes two main sections to help you manage alerts effectively. The Settings section lets you configure how stock notifications work, while the Subscribers section shows all customers who signed up to be notified when products are back in stock.

    To configure, follow these steps:

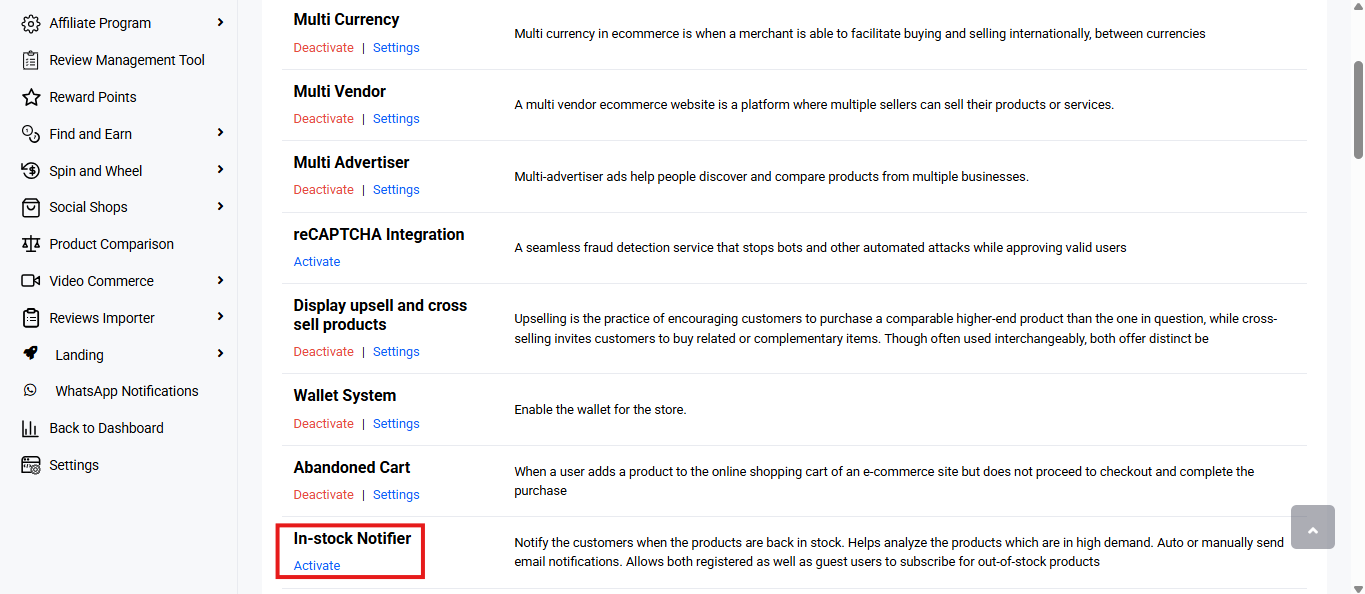
    • Navigate to the sidebar menu and select ‘Plugins’.
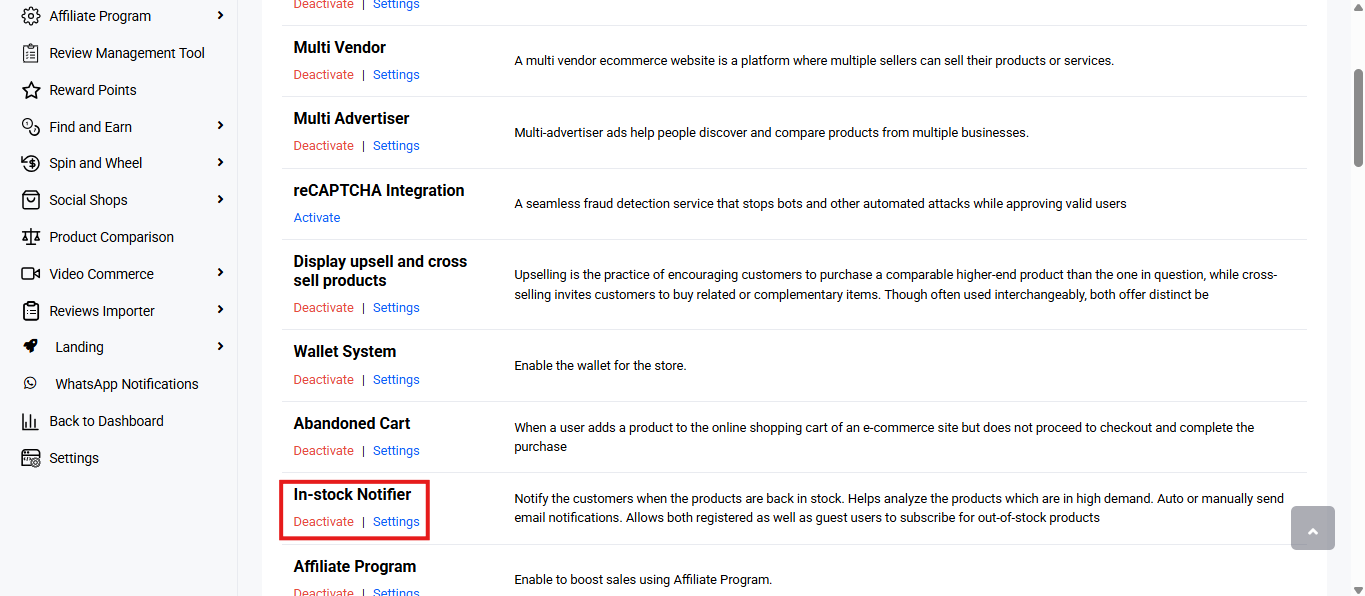
    • Locate ‘In-stock Notifier’ and click ‘Activate’. You will now see two options: ‘Deactivate’ and ‘Settings’. When you click ‘Activate’ or ‘Deactivate’, a toast notification showing ‘In-stock Notifier Plugin Activated’ or ‘In-stock Notifier Plugin Deactivated’ will appear to confirm that the plugin has been activated or deactivated. You can configure the In-stock Notifier by clicking ‘Settings’ after activation or by selecting ‘In Stock Notifier’ from the left sidebar menu.

    You will find two sections: ‘Settings’ and ‘Subscribers’. Here is the detailed description of the available configuration options under ‘Settings’:

    Frontend Form Settings

    Controls the appearance and behaviour of the form shown to customers.

    • Display Type
    • Form Title
    • Placeholder for Name Field
    • Placeholder for Email Field
    • Button Label
    • Hide Name Field in front-end
    • Enable “I Agree” Submission
    • Text for I Agree (privacy policy text)
    • Hide Form after form submission
    • Clear Form after form submission

    When clicking “Submit”
    Toast Message: Successfully Updated Frontend Form Settings

    Visibility Settings

    Defines where and to whom the form appears.

    • Hide Subscribe Form for Guests Users
    • Hide Subscribe Form for Users (logged-in)
    • Show/Hide Subscribe Form for specific Products
    • Show/Hide Subscribe Form for specific Categories
    • Show/Hide Subscribe Form for specific Tags
    • Enable reCAPTCHA for spam protection

    When clicking “Submit”
    Toast Message: Successfully Updated Visibility Settings

    Message Settings

    Sets the on-screen messages that customers see when submitting the form.

    • Success Subscription Message
    • Email Already Subscribed Message
    • Name Field Empty Error
    • Invalid Email Error
    • Email Field Empty Error
    • I Agree Error

    When clicking “Submit”
    Toast Message: Successfully Updated Message Settings

    Mail Settings

    Configures the automated emails sent to subscribers.

    Subscription Confirmation Email

    • Enable Subscription Mail
    • Mail Subject
    • Mail Message (supports placeholders)

    Instock Notification Email

    • Enable Instock Mail
    • Mail Subject
    • Mail Message (supports placeholders)

     When clicking Submit
    Toast Message: Successfully Updated Mail Settings

    Subscribers 

    Here is the description of the available configuration options under ‘Subscribers’:

    • S.No: Displays the serial number of each entry.
    • Email ID: Shows the subscriber’s email address.
    • Status: Indicates the subscription or mail status:
      • Subscribed
      • Unsubscribed
      • Mail Sent
    • Product Name: Displays the product for which the user subscribed.
    • Registered User: Indicates whether the subscriber is a registered customer (Yes/No).
    • Last Modified : Shows the date and time of the latest update to the record.

    Frontend View

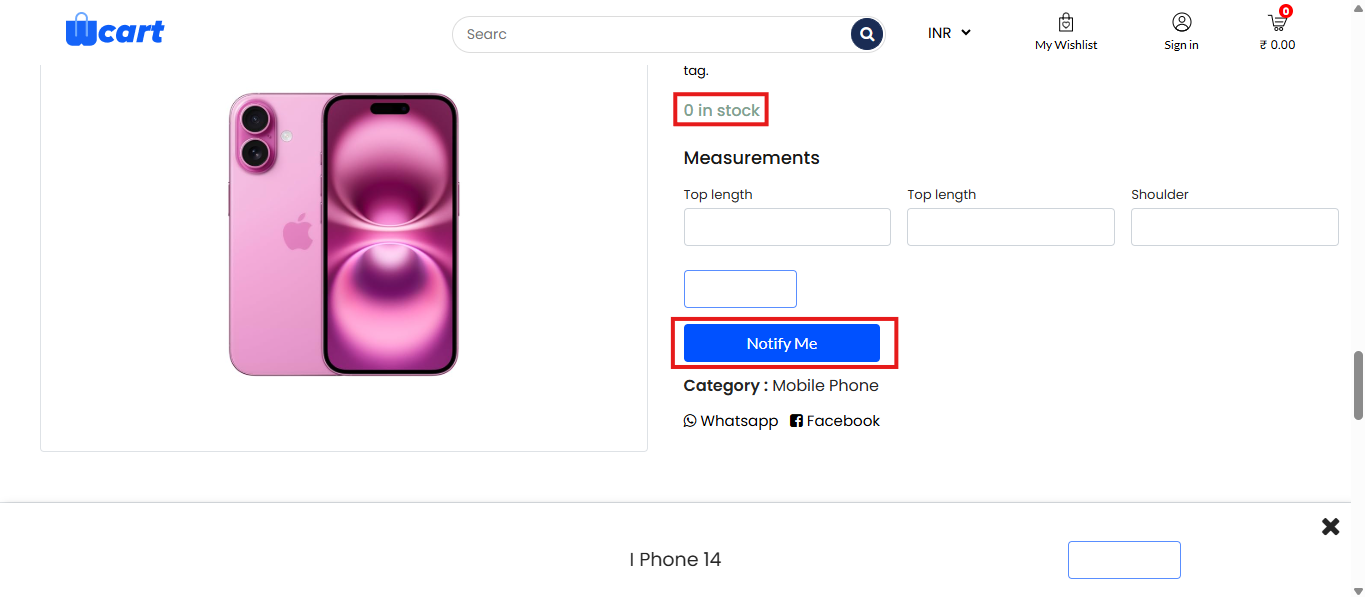
    Customers will see the following indicators and options on the product display page when an item is out of stock.

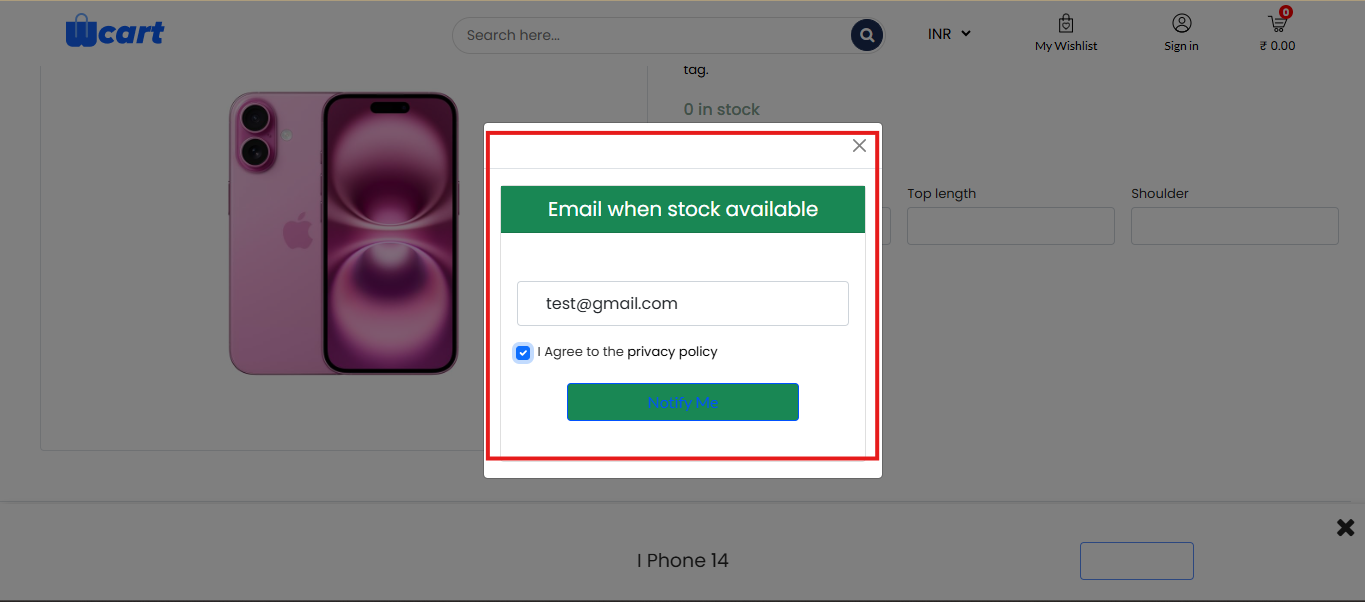
    • Out of Stock Indicator: The product shows a “0 in stock” message, indicating that the item is currently unavailable for purchase.
    • Notify Me Button: If a product is out of stock, a ‘Notify Me’ button will be available. Customers can click this button to sign up for alerts and an email will be sent when the product is back in stock.

    Together, the Settings and Subscribers sections give you complete control over how stock alerts are configured and delivered. They ensure a smooth experience for customers while helping you efficiently manage and monitor all stock notification requests.

  • Adding Product Images & Descriptions

    This section allows administrators to add visual and descriptive content for Simple Products. It includes fields to provide product details, highlight features, and upload supporting media to enhance product visibility and presentation on the storefront.

    You can manage product variants from All Products, Vendor Products, Admin Products, or Add Products under the Products module.

    To configure using All Products, Vendor Products and Admin Products, follow these steps:

    • Navigate to the sidebar menu and select Products.
    • Choose one of the following options: All Products, Vendor Products, Admin Products or Add Products.
    • In the product list, locate the product you want to add images and descriptions.
    • Click the Edit icon under the Action column.
    • Proceed to the configuration page to modify and save your changes. 

    To add images and descriptions for a new product, follow these steps:

    • Navigate to the sidebar menu and find the ‘Products’ section. 
    • Click ‘Add Product’
    • Select ‘Product Type’
    • In the ‘Select Product Type’ dropdown, choose the desired product type.
    • The available options are:
    • Simple: Basic product with no variations.
    • Variable: Product with different variations 
    • Downloadable: Product that can be downloaded digitally.
    • Click on the required type and click ‘Submit’
    • Proceed to the second page of the configuration to modify and save your changes. 

    In both scenarios, you will find the following form fields:

    Fields and Actions

    Short Description: Provide a brief summary of the product’s key highlights and main selling points.

    Long Description: Enter a detailed explanation covering product features, specifications, benefits, and other relevant information that helps customers make informed decisions.

    Upload Product Images: Drag and drop or browse to upload one or more product images. Ensure that high quality images are used to represent the product accurately.

    Upload Product Video: Click Choose File to upload a product related video such as a demo, overview, or promotional clip.

    Save & Continue: Click to save your pricing updates. The following toast notifications will appear confirming the update based on the product type when you edit an existing product:

    • Updated Simple Product Successfully
    • Updated Variable Product Successfully
    • Updated Downloadable Product Successfully

    The below notifications will appear based on the product type if you are adding the images & descriptions while creating a new product:

    • Added Simple Product Successfully
    • Added Variable Product Successfully
    • Added Downloadable Product Successfully

    NOTE: This process is the same for Simple, Variable and Downloadable products.

    These settings ensure product descriptions and visuals are properly configured and displayed on the storefront. Make sure all mandatory fields are completed and saved to guarantee accurate and appealing product presentation to customers.