
This section allows administrators to configure and manage tax settings for the store. It includes options to define general tax rules, add or edit tax rates, and control how taxes are displayed and applied during transactions.
To configure, follow these steps:
- Navigate to the sidebar menu and find the ‘Settings’ section.
- Click ‘Store Settings’.
- Select ‘Manage Tax’ from the submenu.
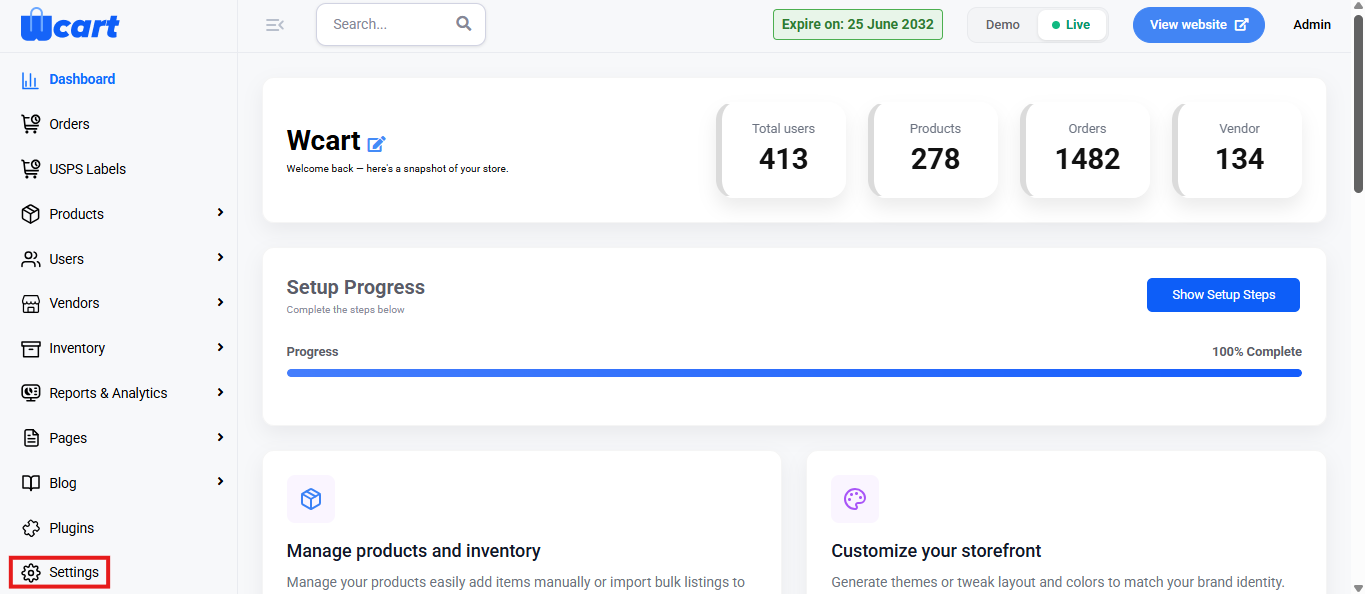
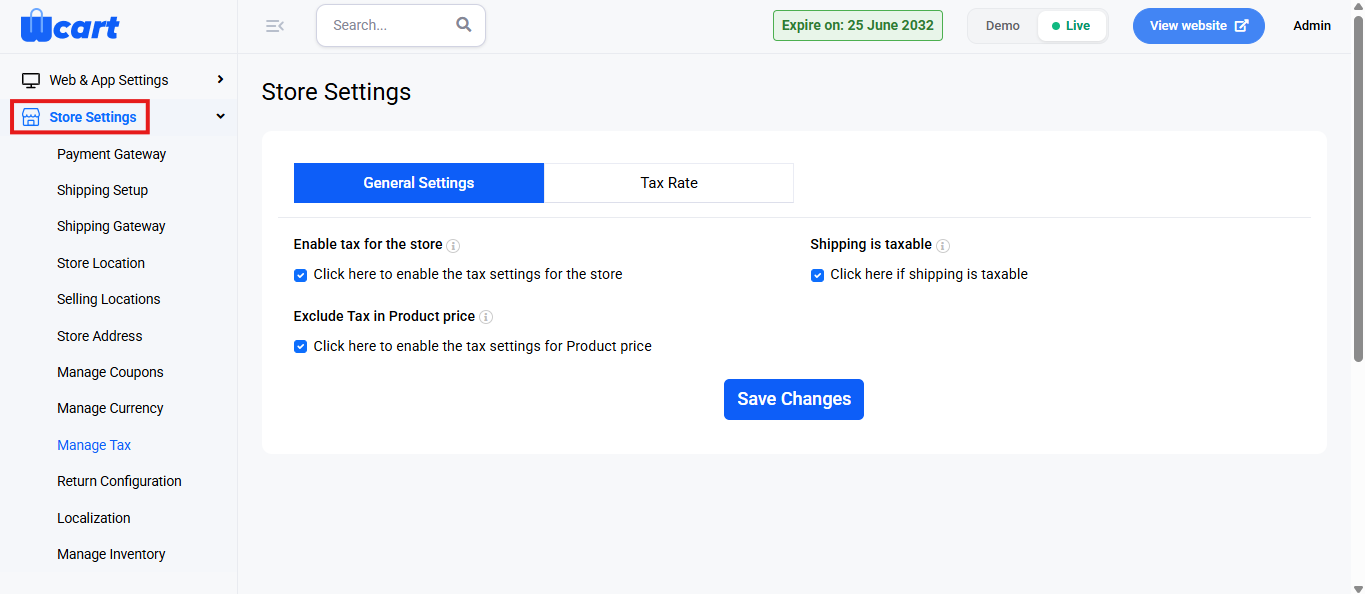
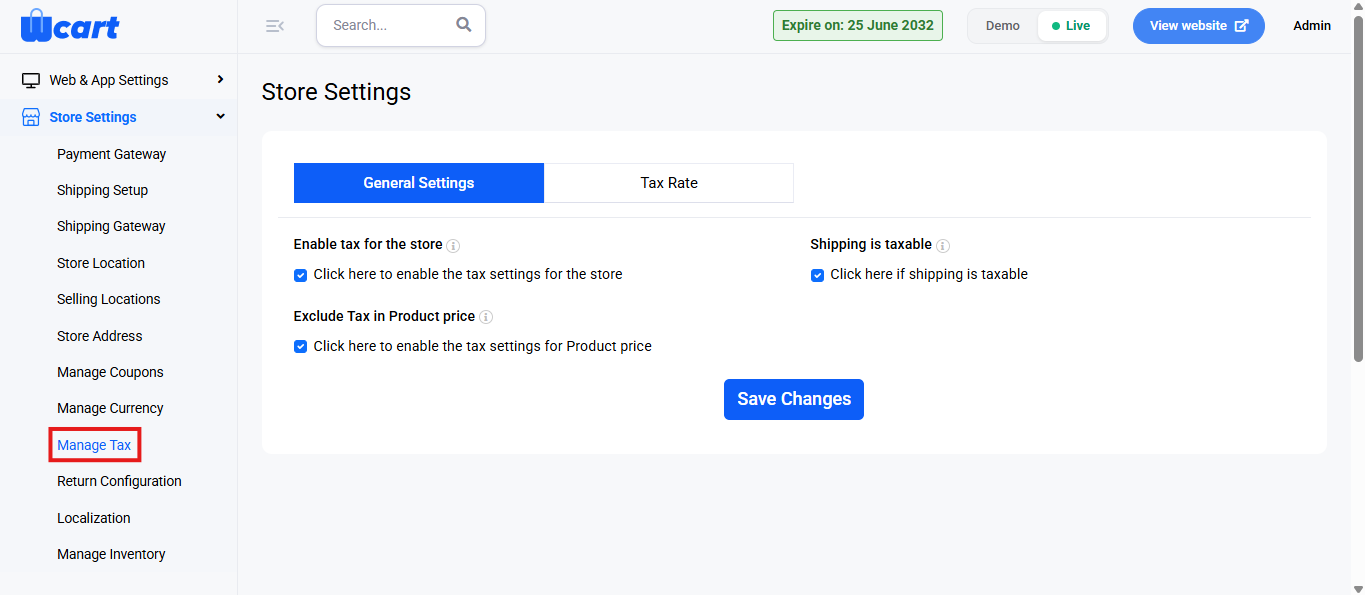
- You will find the following options to configure under ‘General Settings’:
- Enable tax for the store: Enables the entire tax functionality.
- Shipping is taxable: Determines whether tax should be applied to the shipping charges.
- Exclude Tax in Product Price: When enabled, tax is calculated in addition to the product price.
- Save Changes: Save the changes. A toast notification ‘General Setting Updated Successfully’ will appear to confirm the update.
Configure the tax rate by clicking ‘Tax Rate’ from the tab groups:
Tax Rate
Export
Click the Export icon located at the top-right corner of the Tax Rate tab to initiate the download process for all existing tax rate records. A modal dialog box ‘Select file format to Export’ will appear with the these two options:
- CSV
- Excel
Export: Choose either one to directly download the data to your system.
Cancel: Click to return to the tax rate list view.
Import
- Click to open the Bulk Upload section.
- A section titled ‘Import Tax From CSV File’ will open. Below the label you will find a step progress bar displayed with the below mentioned options:
- Upload CSV File: Drag and drop your product CSV file. For reference purposes, you can view a Sample CSV by navigating to the top right to download a template CSV file by clicking on ‘Sample CSV’. Click on ‘Submit’ to move to the next step in the progress bar.
- Column Mapping: The Column Mapping step is the second phase in the bulk upload process. After you upload a CSV file, this section allows you to match each column in your CSV with the appropriate address field used by the system. Below is what each field represents:
- Country Code: Map this to the column that contains the country identifier for each tax record.
- State Code: Select the column that includes the state or region code associated with the entry.
- Postal Code: Map this to the column containing the postal or ZIP codes.
- City Code: Choose the column that lists the city identifiers.
- Percentage Rate: Map this to the column that holds the applicable tax percentage for the location.
- Tax Code: Select the column containing the tax type name or code.
After mapping all fields correctly, click the ‘Submit’ button at the bottom. The system will begin importing the product data using the mapped fields. Click ‘View Tax’ to return to the ‘General Settings’ page.
+ Tax rate
- Country: Pre-filled as India. Select the country where the tax applies.
- Pin code: Enter the area-specific postal code.
- State: Dropdown list to select a state.
- City: Dropdown list to select the target city.
- Percentage Rate: Enter the applicable tax rate as a percentage. Only numeric values are accepted.
- Tax Name: Give the tax a name for identification purposes.
- Cancel: Redirects to the General Settings tab.
- Submit: A toast notification ‘Tax Rate Added Successfully’ will appear to confirm the addition.
Tax-Settings
Navigate to the top right corner of the page and click this button to return to the General Settings tab.
You will find a table with various columns to interpret tax rate data quickly and accurately. The columns are listed below:
- Country Code: Code of the country where the tax is applicable.
- State Code: Code of the applicable state or region.
- Postal Code: Area PIN or ZIP where tax is enforced.
- City Code: Specific city where the tax rule applies.
- Rate of %: The tax rate as a percentage value.
- Tax Name: Custom name for the tax.
- Action: Icons for managing each tax rate:
- Edit : The same fields in ‘Add Tax’ are available to edit and update.
- Delete: Deletes the tax entry. A toast notification ‘Deleted Tax Rate’ will appear to confirm deletion.
These settings ensure that all tax calculations, rates are applied accurately across the store. Review each configuration carefully and save your changes to maintain compliance and consistency before proceeding to the next setup section.