
This module allows administrators to view and manage all blog posts published on the platform. The blog list provides a quick overview with control options for each blog entry.
To configure, follow these steps:
- Navigate to the sidebar menu and select ‘All Blogs’, ‘Add Blog’, ‘Categories’ or ‘Add Category’ based on your requirement.
- You can add, manage and view blogs, as well as add, manage and view blog categories.
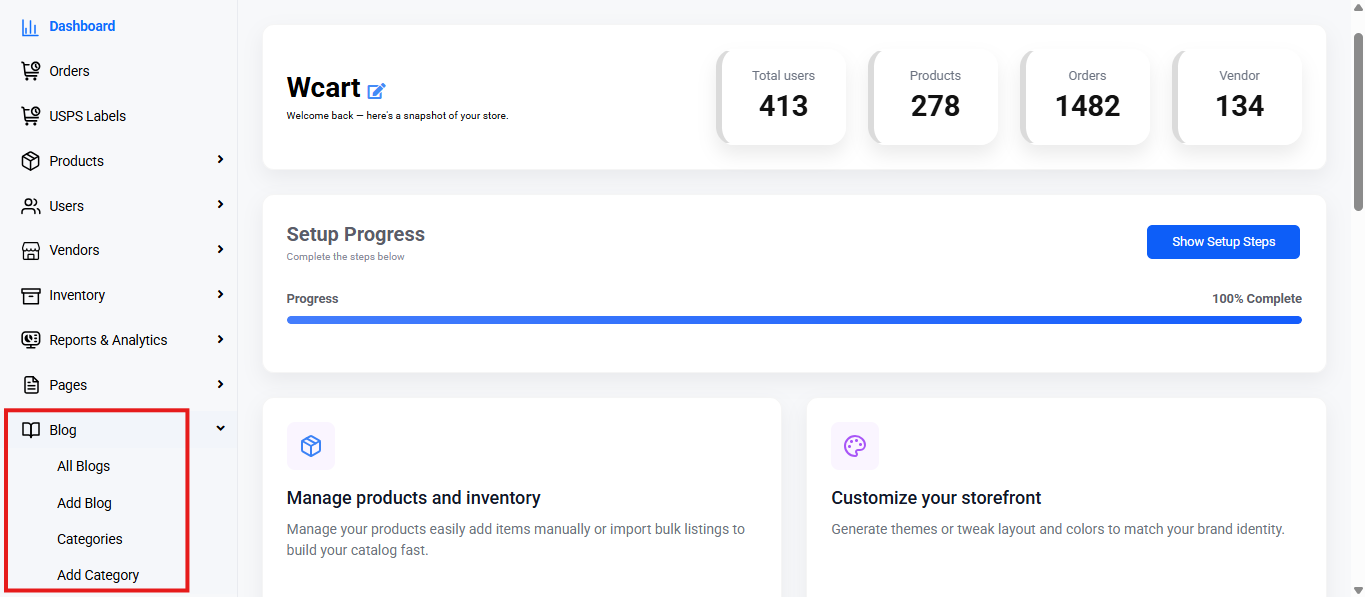
All Blogs
Click the ‘+ Add Blog’ button to manually add a new blog post. You will be directed to the ‘Add Blog’ page with the following form fields:
Manage Blogs
Located at the top right corner of the ‘Add Blog’ page, this icon allows quick navigation back to the blog listing interface.
Basic Details
- Title: Specifies the name of the blog post.
- Choose the options for the product category: Assign the blog to a relevant category for better organization and filtering.
- Upload Product Images: Upload a blog image using drag-and-drop or file upload.
- Description: Text editor that allows entering and formatting the main content of the blog.
Meta Details
- Meta Title: Title shown in browser tabs and search engine results.
- Meta Keywords: Add SEO keywords relevant to the blog post.
- Meta Description: Short summary used in search result snippets.
- Allow Search Results:
- Yes (Default): Blog will be indexed by search engines.
- No: Blog will not appear in search engine results.
- Search Follow:
- Yes (Default): Search engines can follow links on this page.
- No: Disallows search engines from crawling links on this page.
- Blog Status: Dropdown to set the visibility of the blog:
- Publish: Blog is live and visible to users.
- Draft: Blog is saved but not publicly visible.
- Cancel: Discards the form and returns to the previous page.
- Submit: Save your changes. A toast notification ‘Blog Added Successfully’ will appear to confirm the addition.
Now, click on ‘Manage Blogs’ in the top-right corner of the page to return to the All Blogs section, where you will find a table with various columns to interpret blog data quickly and accurately. The columns are listed below:
- S.No: Serial number of the blog post in the current view.
- Title: Title of the blog post.
- Slug: URL-friendly version of the blog title.
- Status: Determines the visibility and lifecycle state of a blog post on the platform.
- Draft: The blog is saved but not visible to the public.
- Publish: The blog is live and visible on the website.
- Action:
- View: Preview the blog post as it appears on the site.
- Edit: Modify blog details in the same form used to create a blog with Slug and Category option.
- Delete: Deletes the category. A dialog box will appear with the text ‘Do you really want to delete the page?’ along with ‘Ok’ and ‘Cancel’ options. Canceling will remove the dialog box and clicking on ‘Ok’ will display this toast notification ‘Removed Blog Successfully’ to confirm deletion.
In addition to viewing and managing all existing blogs, the platform provides a dedicated option to directly add a new blog for faster setup.
Add Blog
NOTE: It contains the same form fields present in the ‘Add Blog’ form section in the previous sidebar menu.
After adding your blog posts, you can manage their organization using categories to structure your content for easier browsing.
Blog Categories
This section displays a list of blog categories maintained within the platform for organizing and managing blog content.
Click the ‘+ Add Blog’ button to manually add a new blog category. You will be directed to the ‘Add Blog Categories’ page with the following form fields:
Manage Blog Categories
Blog Category
Located at the top right corner of the ‘Add Blog Categories’ page, this icon allows quick navigation back to the category listing interface.
Basic Details
- Category Name: Specifies the name of the blog category.
- Description: Rich text editor used to enter and format the content describing the category.
- Upload Images: Upload a category thumbnail using drag-and-drop or by selecting a file manually.
- Featured: Allows you to mark a category as featured.
- Yes: Displays the category in featured sections.
- No: Excludes the category from featured areas.
- Status: Dropdown to define the visibility of the category on the storefront.
- Active: The category is live and visible to users.
- Inactive: The category is hidden from the frontend but remains saved in the system.
Meta Details
- Meta Title: Title used for SEO and browser tabs.
- Meta Keywords: Keywords for improving search engine ranking.
- Meta Description: Short summary of the category for search engine snippets.
- Allow Search Results:
- Yes (Default): Enables indexing by search engines.
- No: Prevents search engines from displaying this category in results.
- Search Follow:
- Yes (Default): Allows search engines to follow links in this category.
- No: Disallows search engine bots from following links.
- Actions
- Cancel: Discards unsaved changes and returns to the previous screen.
- Submit: Saves the new or edited category. A toast notification ‘Category Added Successfully’ will confirm the addition.
Now, click on ‘Blog Category’ in the top-right corner of the page to return to the All Categories section, where you will find a table with various columns to interpret blog category data quickly and accurately. The columns are listed below:
- S.No: Serial number of the category in the current view.
- Category Name: Name of the category as entered in the form.
- Slug: SEO-friendly URL identifier for the category.
- Status: Indicates the current visibility state of the blog category on the storefront:
- Active: The category is live and visible to users.
- Inactive: The category is hidden from the storefront.
- Action
- Edit: Opens the category form in edit mode with all existing values populated.
- Delete: Deletes the category. A dialog box will appear with the text ‘Do you really want to delete the page?’ along with ‘Ok’ and ‘Cancel’ options. Canceling will remove the dialog box and clicking on ‘Ok’ will display this toast notification ‘Blog Category Deleted Successfully’ to confirm deletion.
In addition to viewing and managing all existing categories, the platform provides a dedicated option to directly add new categories for faster setup.
Add Category
NOTE: It contains the same form fields present in the ‘Add Category’ form section in the previous sidebar menu.
This module makes it easy to create, organize and manage blogs and categories, helping administrators keep content well-structured and easy to find.